No Bake Oreo Dessert

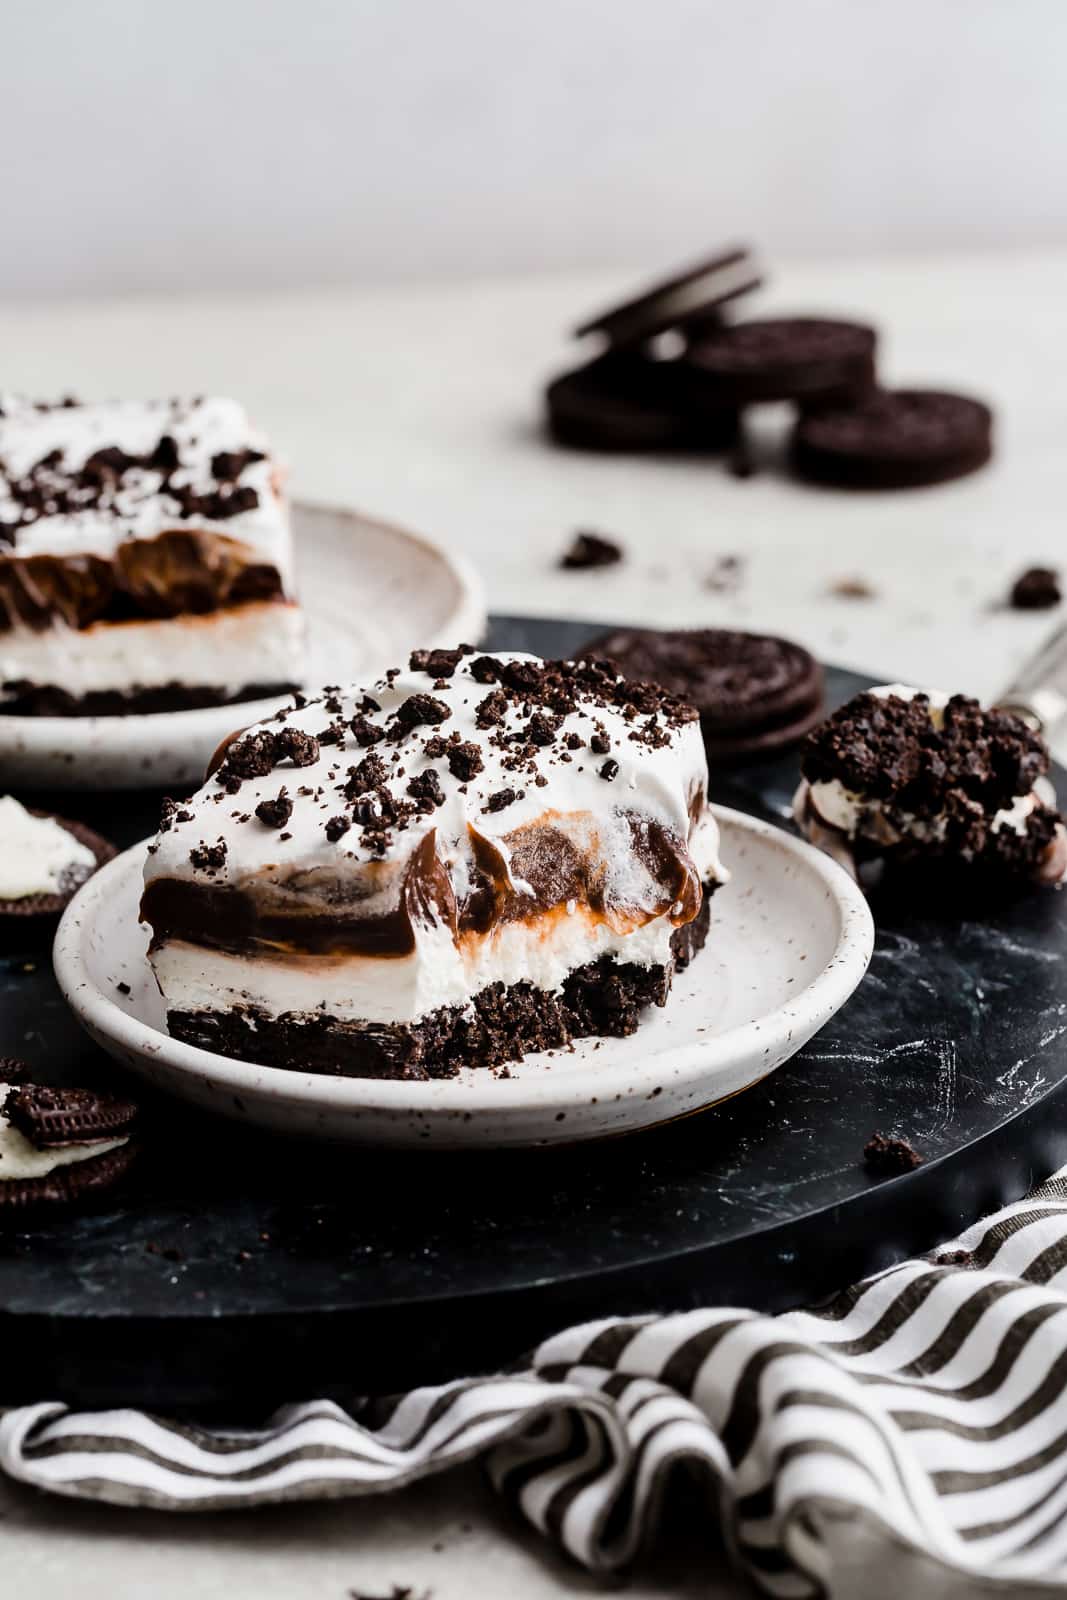
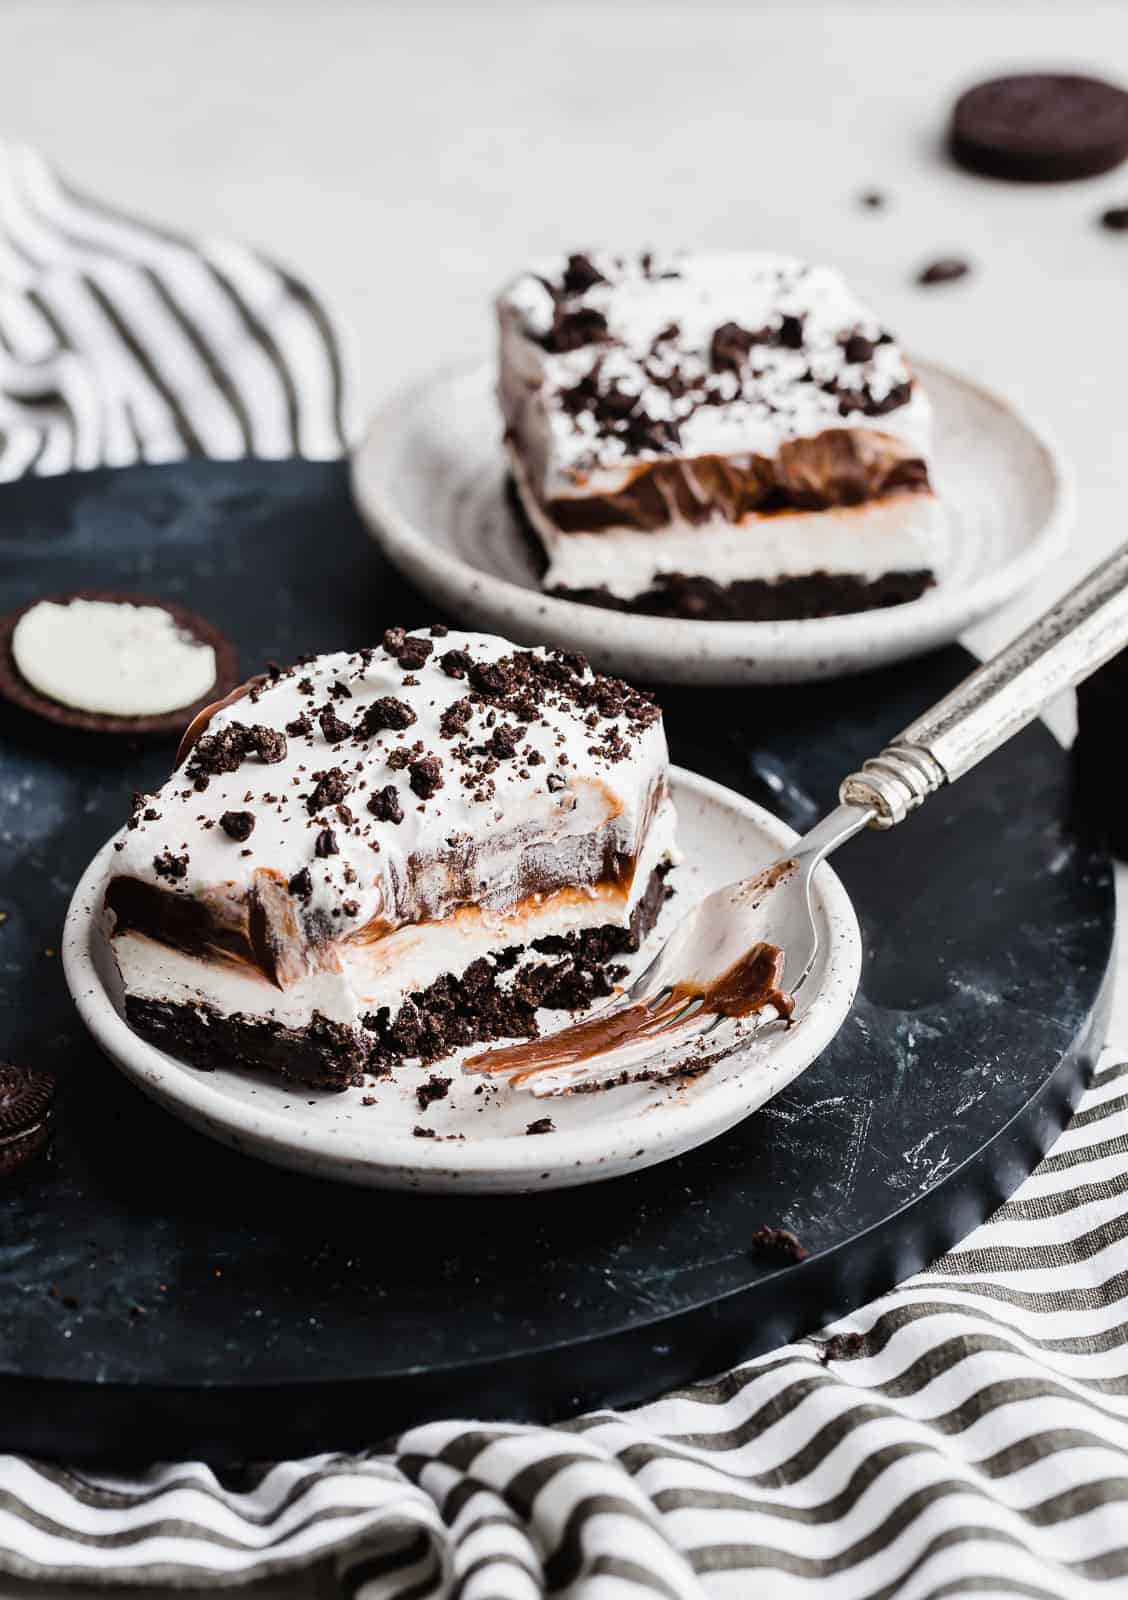
This easy No-bake Oreo Dessert has delicious layers: Oreo crust, a cream cheese filling, chocolate pudding layer and is then topped with whipped cream and Oreo crumbs. It comes together quickly and is gobbled up in no time!
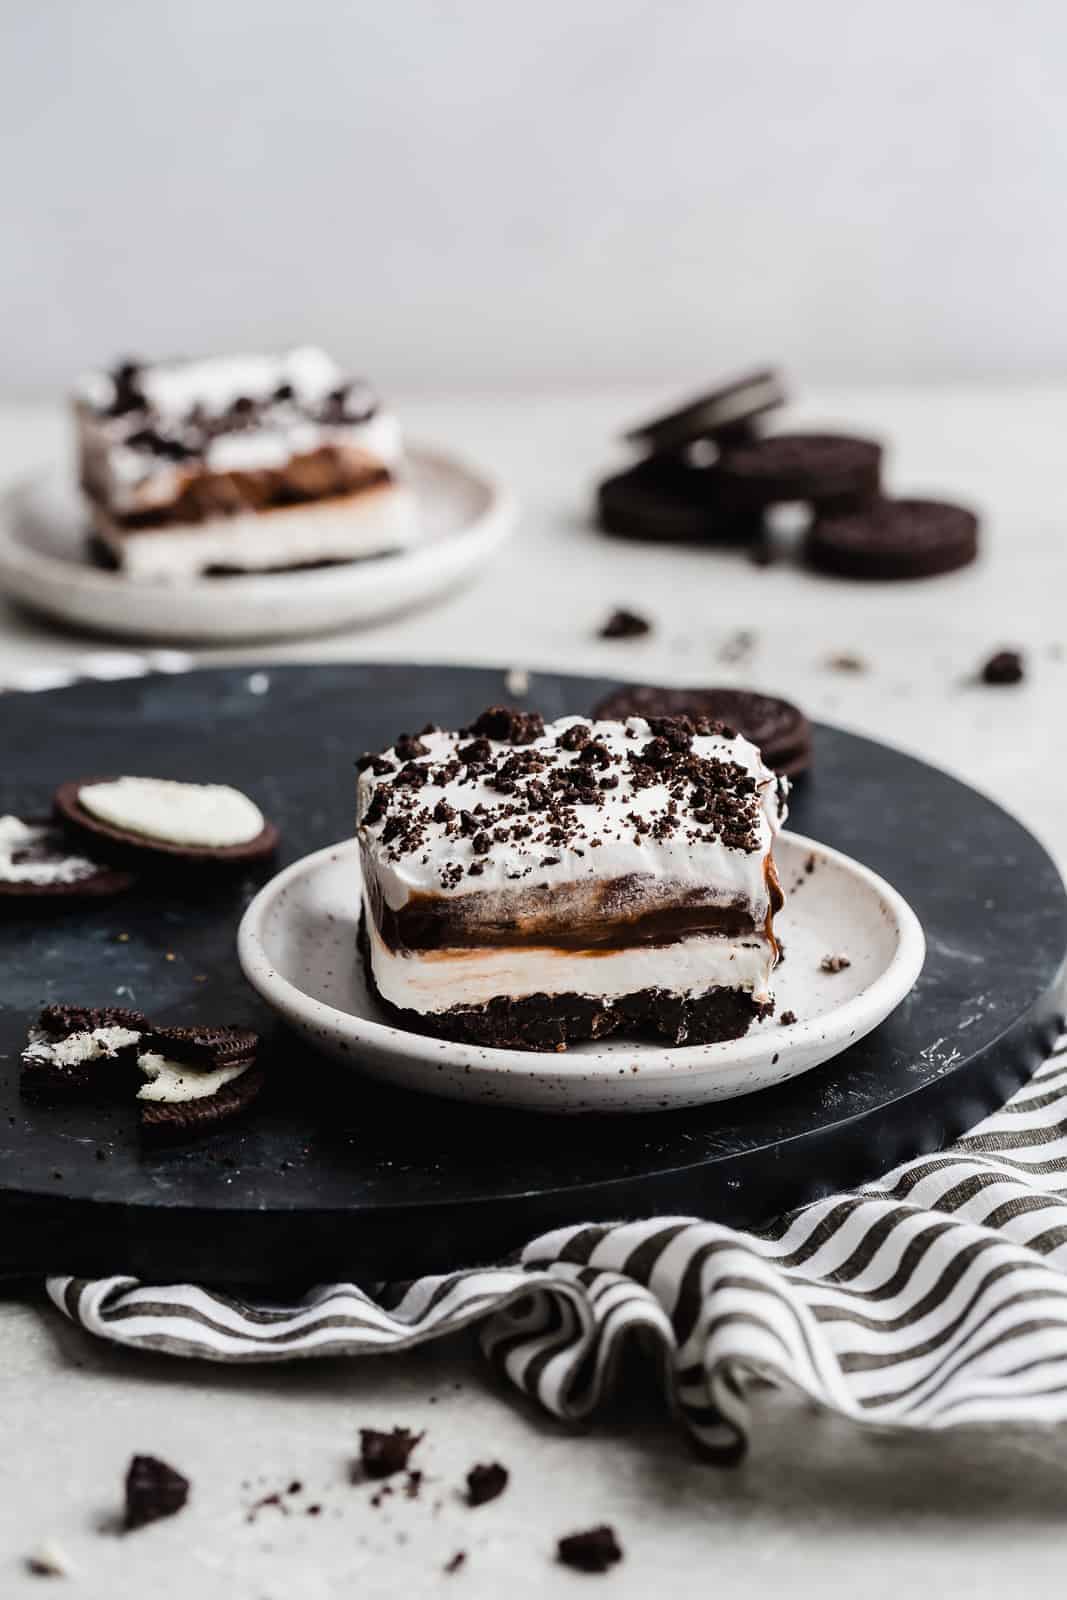
This Oreo layer dessert can be referred to as a lush dessert. Have you ever heard of that? Confession: I hadn’t. I always just called them layer desserts! But lush desserts are built with a cookie crust, two fillings and a whipped topping. These lush desserts or layer desserts can be put in a 13×9-inch pan or in a glass trifle dish to show off the layers.
I’m a bit of a sucker for Oreo everything. On my website you’ll find recipes for copycat Crumbl Oreo Sandwich Cookies, Oreo milkshakes, Oreo truffle brownies, Oreo ice cream cake, homemade no-church Oreo ice cream, Cookies ‘n cream cookies, and Oreo popsicles! I have an Oreo recipe for any and all seasons and celebrations!
The perfect thing about this dessert is it’s a quick and easy no-bake dessert option — and you most likely have some of the ingredients chilling in your fridge or pantry. This is a chilled dessert, but it isn’t a frozen ice cream layered dessert. If you are looking for a frozen option, try my Oreo ice cream cake.
Ingredients
Crust:
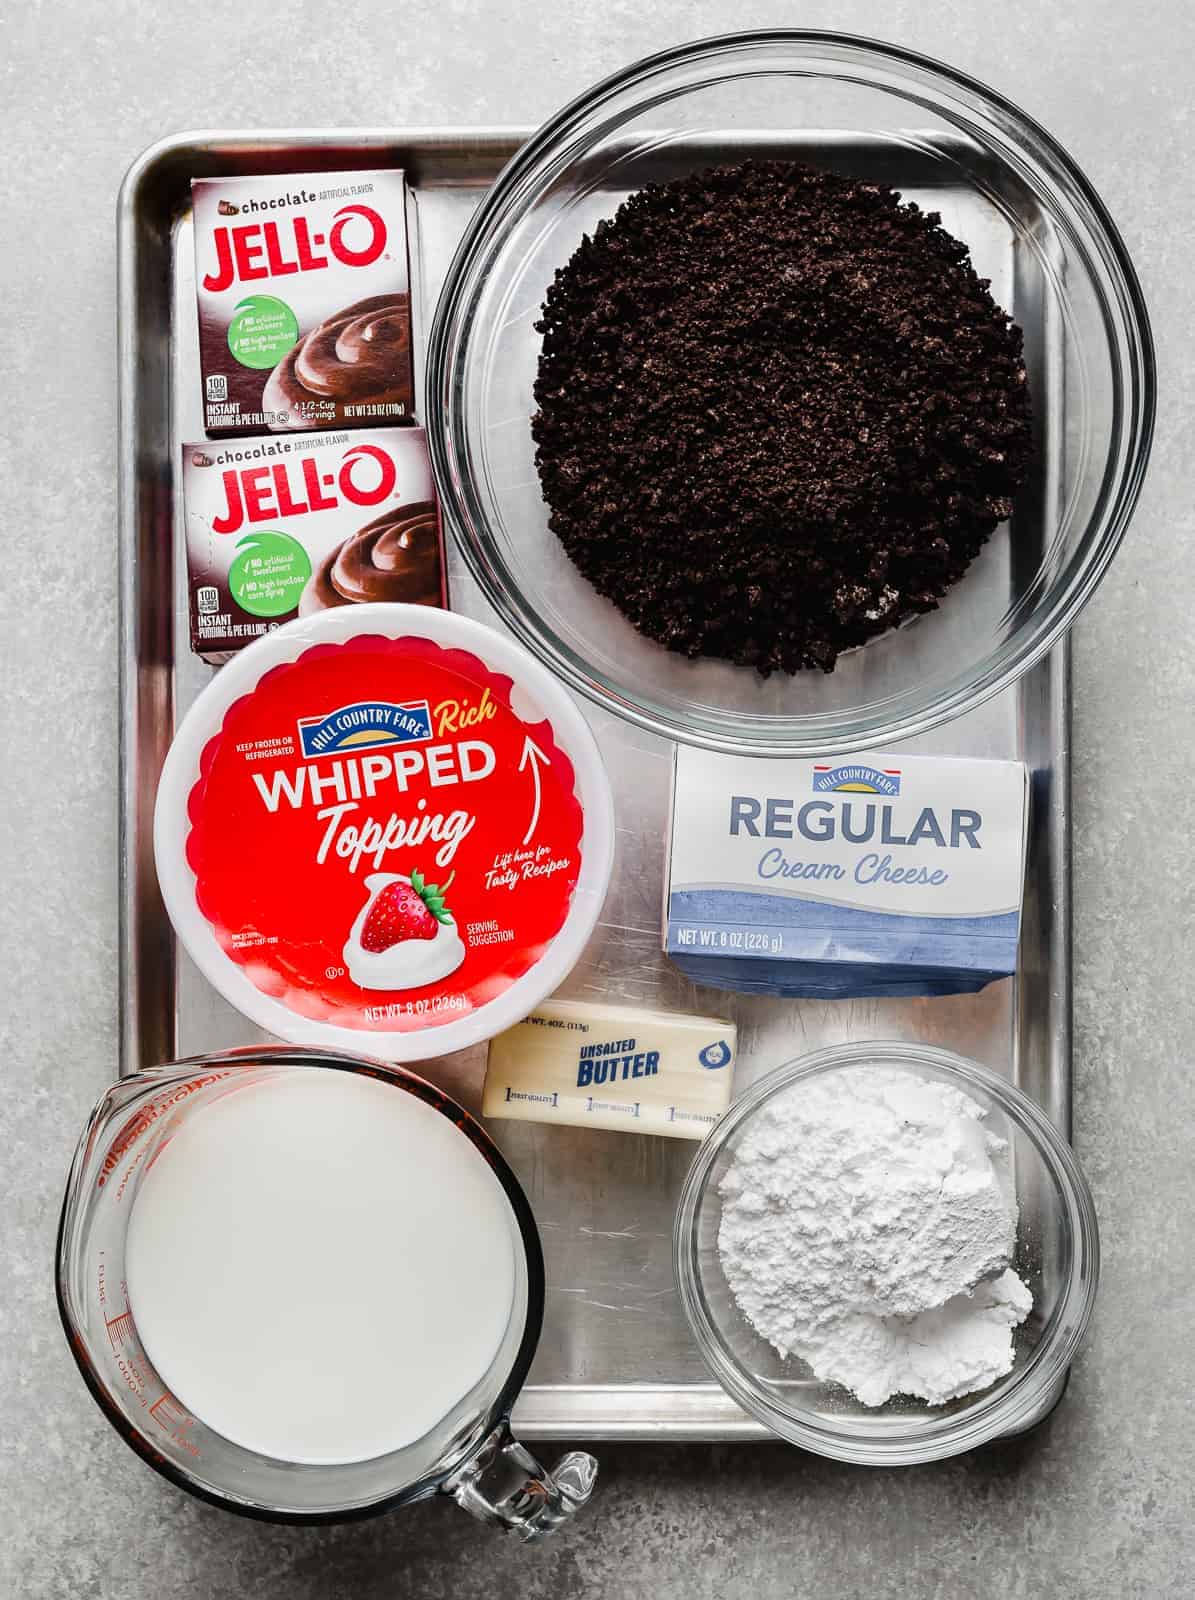
- Oreo cookies — About 40 cookies, regular or double stuf is fine.
- Butter — Melted. This will help form the crust and keep the Oreo cookies together.
Cream cheese layer:
- Cream cheese — Make sure it is softened (if you forget to pull out your cream cheese beforehand you can microwave it for 15-25 seconds and that will soften it right up! We need the cream cheese nice and soft so it combines well without clumps.
- Powdered sugar — Using powdered sugar ensures we don’t have sugar granules.
- Cool Whip — The kind you buy in a tub at the store. I haven’t made this with homemade whipped cream and I’m not sure it would hold up as well. I recommend using cool whip.
Chocolate layer:
- Instant Chocolate Pudding mix — The chocolate layer is essentially a homemade pudding. You can use a mix or try my chocolate pudding recipe.
- Milk — Make sure it’s cold! Any percentage is fine. We’ll mix this in with the chocolate pudding mix.
Whipped Topping:
- Cool Whip — I recommend using the store-bought tub of cool whip for both cool whip options in this dessert. Homemade whipped cream won’t hold as well.
How to Make No-Bake Oreo Dessert
Make the crust:
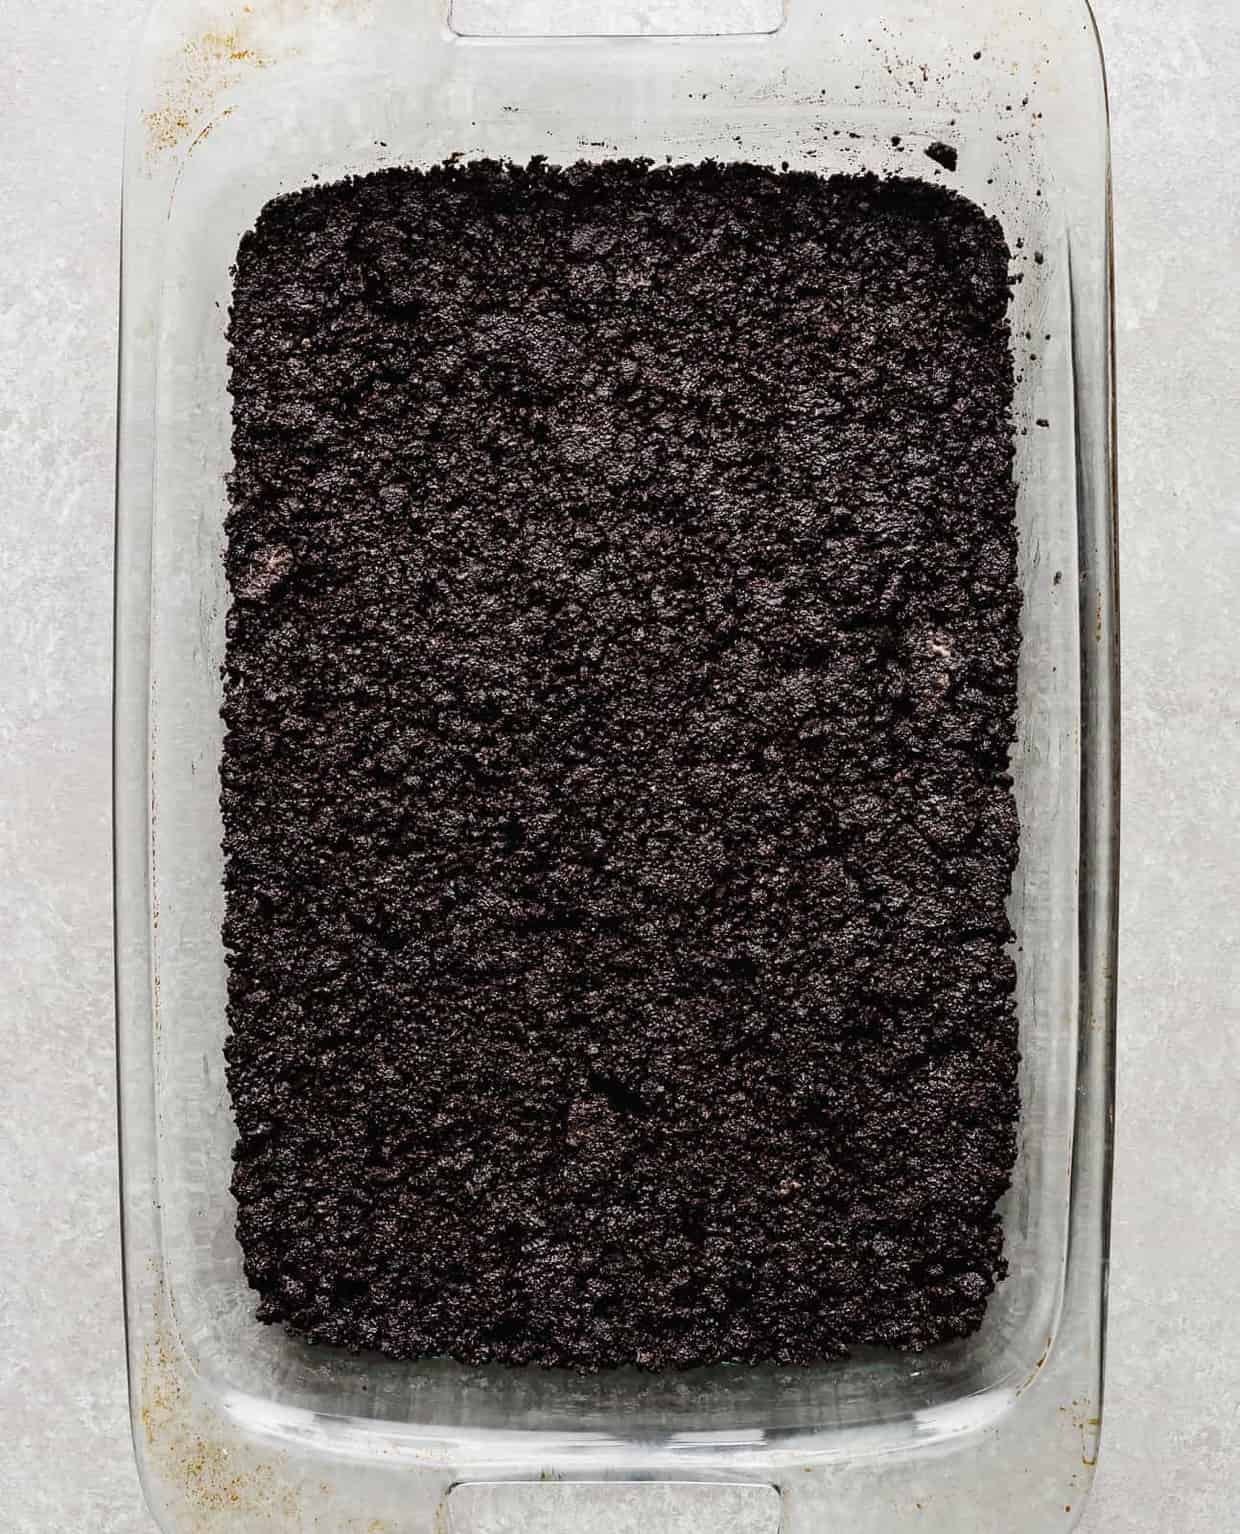
- Crush the Oreos (either in a food processor or in a Ziplock bag using a rolling pin to help crush the Oreos). They shouldn’t be in too fine of a crumb. Have some slight Oreo chunks throughout.
- Place the Oreo crumbs in a medium sized bowl. Measure out ¼ cup of Oreo crumbs to use for the top! Stir the melted butter into the Oreos and mix to combine.
- Transfer the Oreo mixture to a 13×9-inch dish. Press the crumb mixture along the bottom of the pan. Refrigerate while you prep the remaining ingredients.
Cream Cheese Layer:
- In a medium bowl, beat the cream cheese until smooth (you don’t want any lumps). The key to getting a smooth cream cheese layer is to have the cream cheese softened (I’ll even microwave the cream cheese for 20-30 seconds to ensure it’s soft). Once smooth, beat in the powdered sugar.
- Using a spatula, fold the cool whip into the cream cheese mixture. Spread this mixture over the Oreo crust. Place back in the fridge while you prep the pudding.

Make the Pudding Layer:
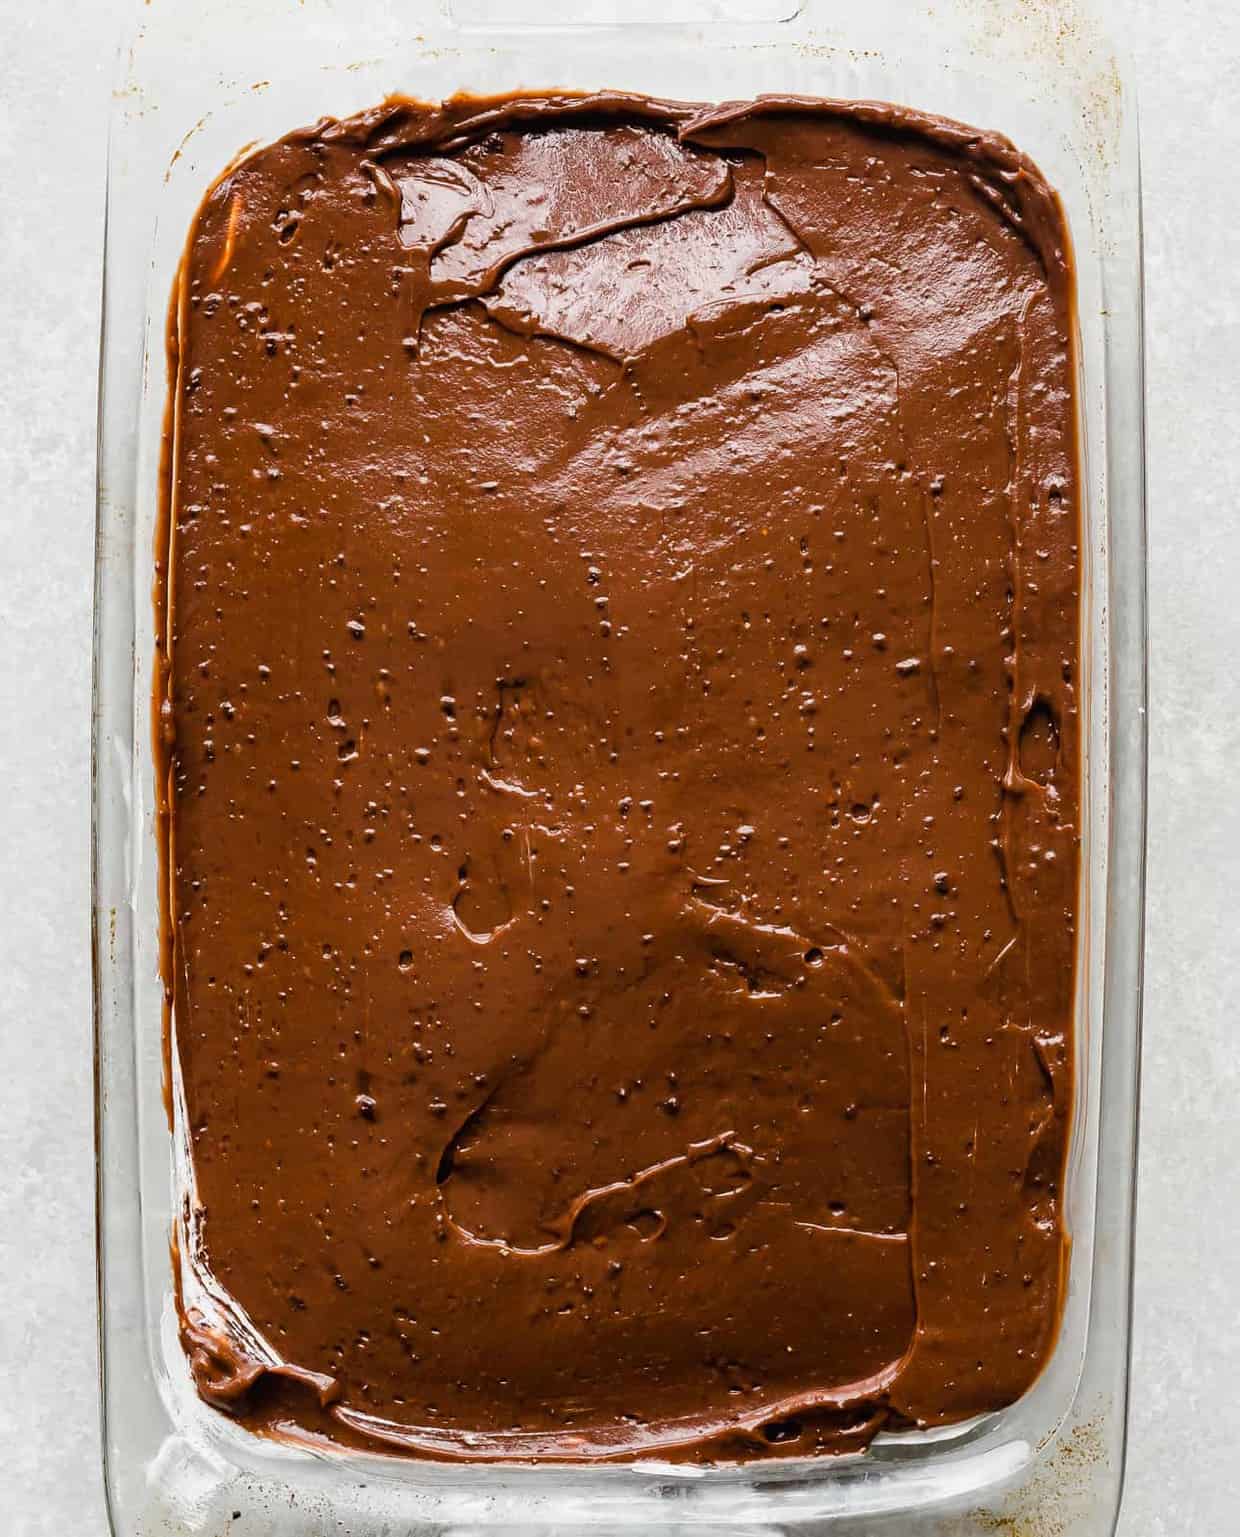
- In a large bowl, mix the dry pudding mix and milk for 2 minutes. Let the mixture sit for another 5 minutes.
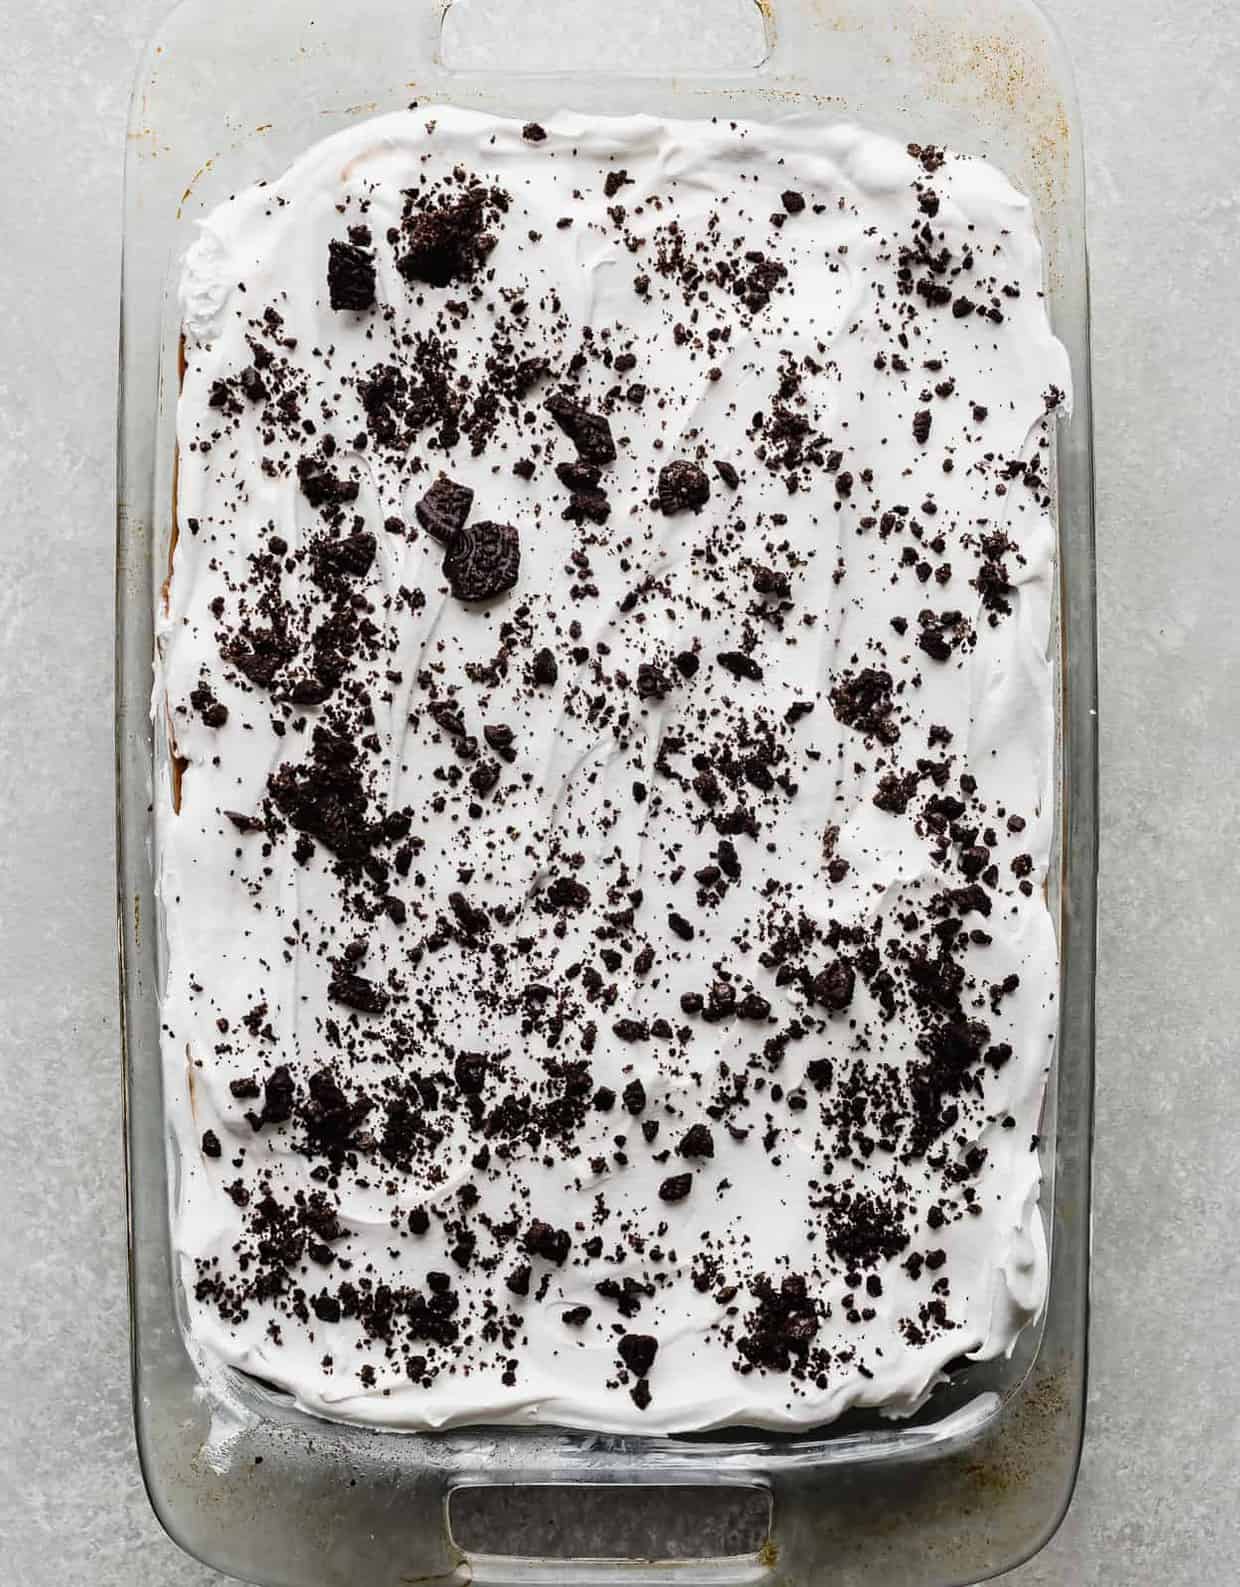
- Spread the pudding over the cream cheese layer. Spread the 8 oz Cool Whip over the pudding and top with the remaining crushed Oreos.
Refrigerate for 4 hours or overnight to let set. When ready to enjoy, slice and serve.
Tools Used for This Recipe
Mixing bowls – these are my favorite!
Recipe Tips
Use Cool Whip for the whipped topping in this recipe. It will be firmer and hold up better.
We want some Oreo chunks in the crust, so don’t crush them too much.
FAQs
How do you soften cream cheese?
Set it out at room temperature for a few hours. If using the microwave, remove the foil and put the cream cheese in a microwave-safe bowl. Microwave for 15-20 seconds. If the cream cheese isn’t softened, microwave for 5-second increments until softened. Just make sure it doesn’t start to melt! You can also soften cream cheese by putting the cream cheese (still wrapped and sealed in the foil) in a bowl of warm water for a few minutes, rotating halfway through.
Can I use homemade whipped cream in this dessert?
I’d recommend Cool Whip because it will hold up better than a homemade whipped cream.
Can I use a dairy-free whipped topping?
I haven’t tried it with a dairy-free whipped topping. Try it and let me know! If you’re looking for a dairy-free whipped cream option, try out my coconut whipped cream!
More Dessert Recipes
No-Bake Oreo Dessert
Ingredients
Crust
- 40 Oreo cookies - regular or double stuf is fine
- 1/2 cup unsalted butter - melted
Cream Cheese Layer
- 8 oz cream cheese - softened
- 1 cup powdered sugar
- 8 oz Cool Whip
Chocolate Layer
- 2 3.9 oz packages instant chocolate pudding mix
- 3 1/4 cups cold milk - 1%, 2%, or whole is fine
Whipped Topping Layer
- 8 oz Cool Whip
Equipment
Instructions
Crust
- Crush the Oreos (either in a food processor) on in a Ziplock bag and then use a rolling pin to help crush the Oreos. They shouldn’t be in *too* fine of a crumb. Have some slight Oreo chunks throughout. Place the Oreo crumbs in a medium sized bowl. Measure out ¼ cup of Oreo crumbs to use for the top! Stir the melted butter into the Oreo’s and mix to combine. Transfer the Oreo mixture to a 13×9 inch dish. Press the crumb mixture along the bottom of the pan. Refrigerate while you prep the remaining ingredients.
Cream Cheese Layer
- In a medium bowl beat the cream cheese until smooth (don’t want any lumps). Key to getting a smooth cream cheese layer is to have the cream cheese softened (I’ll even microwave the cream cheese for 20-30 seconds to ensure it’s soft). Once smooth, beat in the powdered sugar. Using a spatula, fold the cool whip into the cream cheese mixture. Spread this mixture over the oreo crust. Place back in the fridge while you prep the pudding.
Make the Pudding Layer
- In a large bowl mix the pudding and milk for 2 minutes. Let the mixture sit another 5 minutes then spread the pudding over the cream cheese layer. Spread the 8 oz Cool Whip over the pudding and top with the remaining crushed Oreos.
- Refrigerate for 4 hours or overnight, to let set.
 Welcome to this delicious corner of the internet! Here I share the recipes my family loves.


12 Comments on “No Bake Oreo Dessert”
I am making this right now, do I remove the filling in the Oreo before crushing?
No, leave it in.
MADE THE RECIPE BUT REPLACED CHOCOLTE CUSTARD WITH CHOCOLATE GANACHE. IT CAME OUT VERY WELL AND THE TASTE MY GOD WAS HEAVENLY. BUT UNFORTUNATELY IT CANNOT BE TAKEN OUT TO ENJOY IN THE BEACH AS IT MELTS OF IN 15 MINUTES ADTER REMOVING FROM THE FREEZER. ANY SUGGESTIONS? THANKS FOR THE LOVELY RECIPE
So glad you love the recipe, Vasanth! Thanks for the 5-star review! As for transporting it, depends on how far away the beach is. You can transport it in a cold cooler, but it is a dessert that can’t sit out that long. I would recommend bringing a dessert to the beach that you don’t have to keep refrigerated. Good luck!
I made this dessert for our family get together tonight, and everybody raved about it! It was so creamy and dreamy and chocolatey and oh so good! I can’t wait to make another one of your recipes!
I want to make this for a party, but I’m wondering if I can make it the day before I serve it. Should I not add the final cool whip layer until ready to serve? Is it ok to keep in the fridge for that long before serving or does it all meld together? Help! 🙂
You can make this in advanced, should be just fine!
If I wanted to half this recipe, would an 8×8 pan be okay?
Yep that should be fine!
This is delicious and a hit from everyone who eats it! I make it over and over again for get togethers or parties!
Made this But it calls for 1 – 8 oz
of cool whip to mix in with the cream cheese. Then in the next directions it says to put 1 -8 oz cool whip on top of the chocolate layer. So why does the ingredients only call for 1 8 oz of cool whip when you need 1-8 oz of cool whip. It’s confusing.
8 oz of cool whip topping is shown in the ingredient list 2 times. Once underneath the “cream cheese layer” and a second time under the “whipped topping layer”