How to Make Ravioli
It’s easy to learn how to make ravioli with the right step-by-step instructions and tools. Homemade ravioli is way better than store-bought ravioli — and it’s also fun because you can add whatever filling you want!
My favorite filling is my butternut squash filled ravioli. But feel free to customize your raviolis and try new filling combinations! For example you could make a sausage stuffed ravioli and serve it with a red sauce or a thyme ricotta and parmesan filled ravioli served with a bed of red tomatoes.
Why This Recipe Works
- I used my Kitchen Aid pasta attachment for this homemade ravioli recipe — which saves so much time!
- The half batch isn’t as time consuming and still makes a good amount of ravioli, so if this is your first time making ravioli, start with the half batch of ravioli dough.
- Homemade ravioli is better than store-bought because you can add whatever fillings you want! Plus you could do half of them with a cheese filling and half with a meat filling, mixing things up even more — or customizing for differing food allergies or preferences.
- This recipe is the perfect step-by-step for making homemade ravioli so you won’t feel overwhelmed with the process.
Ingredients
- Eggs — You’ll use full eggs and egg yolks
- Flour — You’ll make a flour well to make the dough. I’ll explain it all below 🙂
- Salt — For added flavor
Step-by-Step Instructions
Make the Ravioli Dough
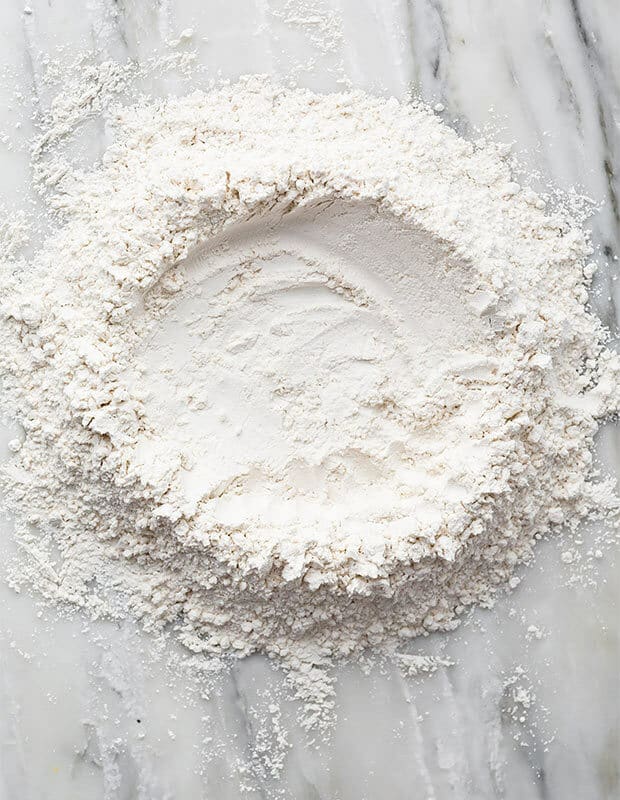
- Mix the flour and salt together on a clean work surface. Form into a 12 inch diameter mound.
- Using your hands, make a well in the flour and salt mixture.
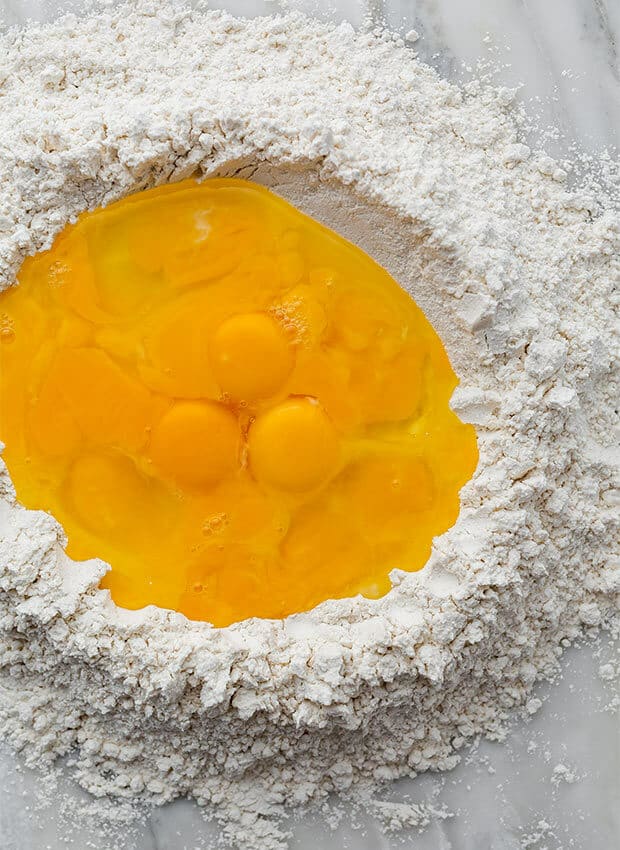
- Pour the eggs and egg yolks into the well.
- Using a fork, gently beat the eggs and yolks. Once they’re smooth, slowly incorporate the flour into the eggs. Do this slowly and little by little. You don’t want the “flour wall” to collapse, or accidentally grab too much flour and then suffer the consequences i.e. eggs spilling out.
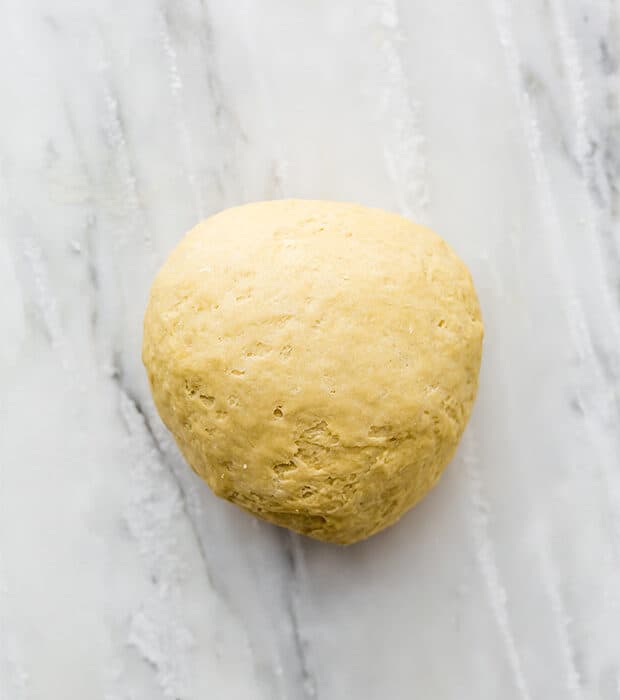
- Once you’ve incorporated the flour into the eggs, use your hands to help bring the dough together. The dough will take some time before it turns smooth.
- Form the dough into a ball.
- Begin kneading it for 10 minutes. Pushing the dough with the heel of your hand, and then rotating it.
- You’ll know the dough is ready when you press into it and it springs back. The dough should have a nice smooth appearance to it.
- Wrap the dough with plastic wrap and let it sit for 30 minutes at room temperature.
- If you aren’t using the dough right away, place it in the refrigerator until ready to use. When ready to use, remove from the fridge and bring it to room temperature before rolling it out.
Roll the Ravioli Dough
- Roll out the ravioli dough to about 1/16″ or so — not too thin and not too thick. Sectioned into 8 pieces if doing the full batch and 4-6 if doing the half batch.
- Flatten each portion of the sectioned pasta dough into a rough rectangular shape. Cover both sides with a dusting of flour.
- Attach the pasta sheet roller to your stand mixer and set it to #1. Turn the stand mixer to speed setting 1 (or 2) and run the ravioli pasta dough through the pasta sheet roller. While on #1, fold the the dough in half and run it through again. Repeat at least 4 more times: fold dough in half, run it through pasta sheet roller, fold dough in half, run it through pasta sheet roller etc.
- Once you’ve run the dough through the #1 setting several times, flour both sides of the dough and change the pasta sheet roller to #2. Run the pasta through the #2 setting two times.
- Change the setting to #3 and run it through 1x.
- Change the setting to #4 and run it through 1x. If you want thick ravioli you can stop here. If you prefer a thinner pasta dough, continue to #5 setting and roll it through once.
Make and Fill the Raviolis
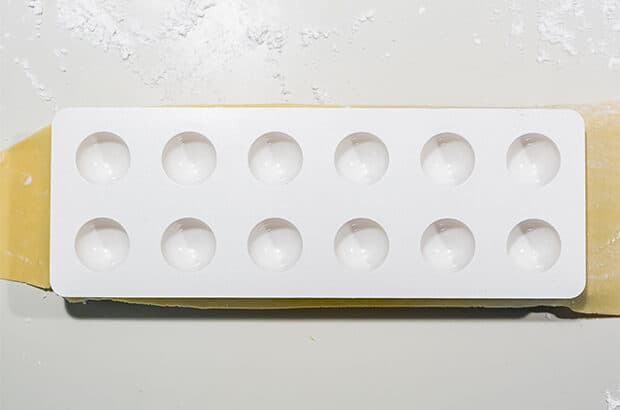
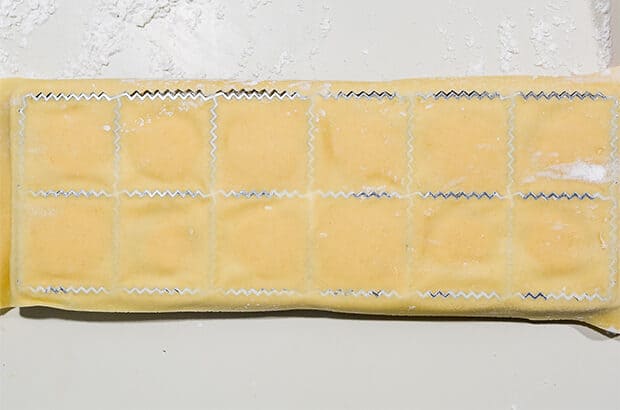
- Flour the ravioli mold. If using a ravioli mold (like pictured) flour it generously! You need the ravioli frame heavily floured in order for the ravioli to easily release from the mold.
- Use your favorite ravioli filling, I used my butternut squash ravioli recipe.
- Place the sheet of pasta dough over the ravioli mold.
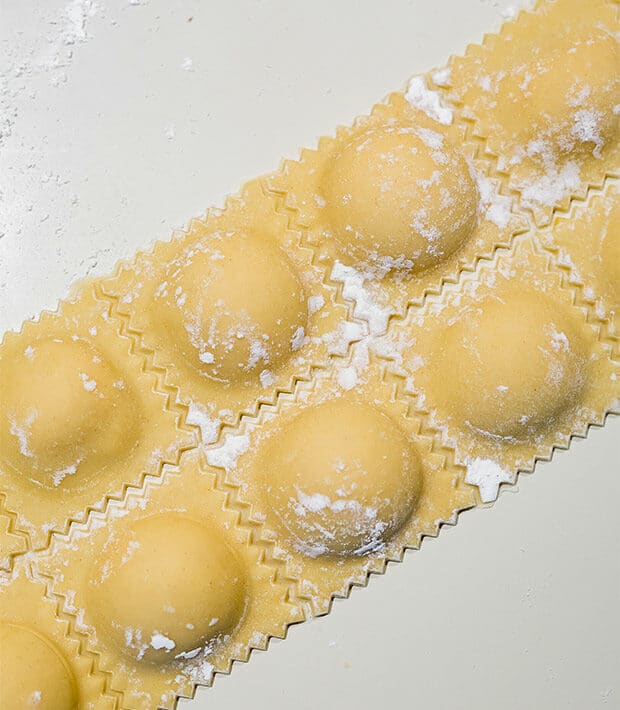
- Create a small indent in the ravioli holes, being careful not to tear the pasta. If you use a ravioli mold like I did, you will place the white portion over the dough and gently press down, as pictured below. This will create a small divot in the dough.
- Fill each cube with 1 tablespoon of filling.
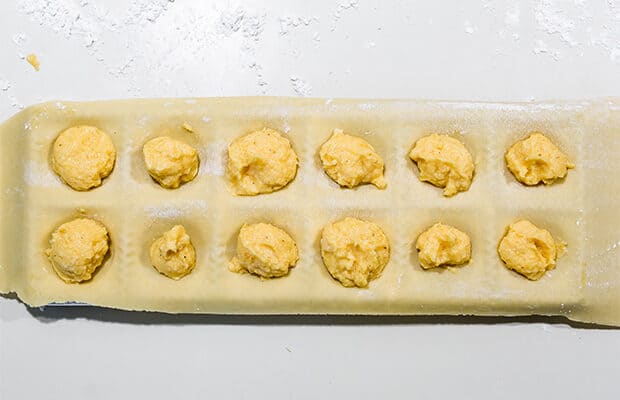
- Cover the filled ravioli with dough.
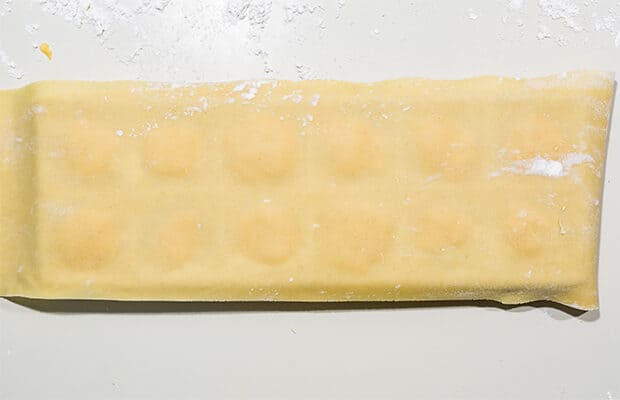
- Use a rolling pin and roll overtop the dough so that it seals.
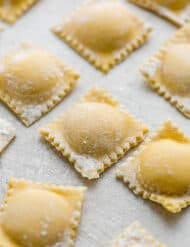
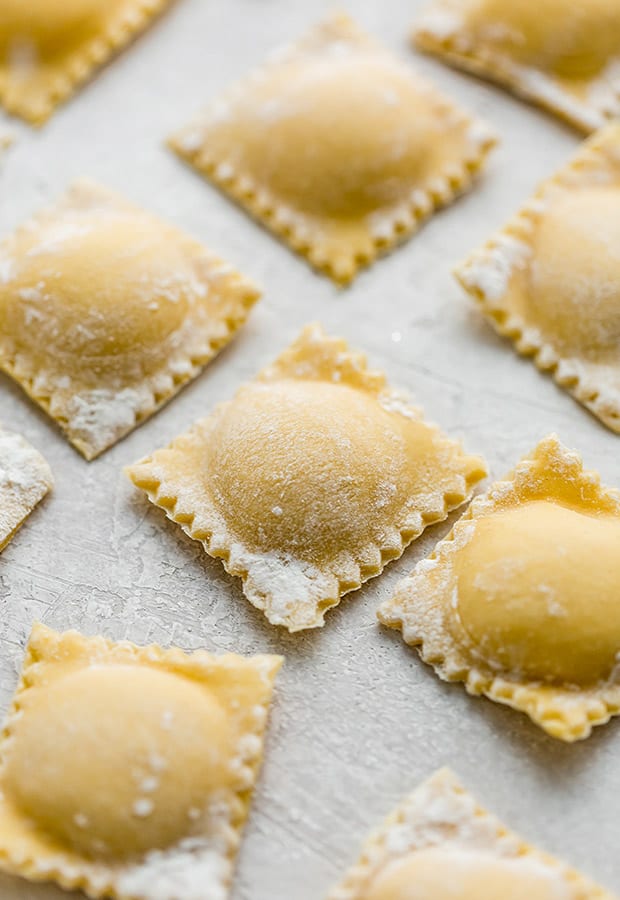
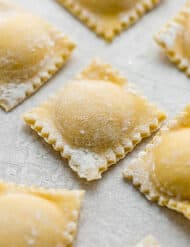
- Turn the mold over and tap it on the counter to release the ravioli. Use a knife to separate any ravioli that are stuck together.
- Place the filled ravioli on a baking sheet lined with parchment paper and dusted with flour. Continue making ravioli until the dough and filling is all used up.
Cook the Homemade Ravioli
- Place a large pot of water over medium heat. how long to cook fresh ravioli
- Once boiling, add a tablespoon of salt to the water. Place 8 or so ravioli into the pot, being careful not to overcrowd. You’ll want to do this in batches.
- Cook for 3-4 minutes. You’ll know how long to cook fresh ravioli to perfection because they’ll float to the top. Using a slotted spoon, transfer the ravioli to a lightly oiled plate OR place in a skillet with the sauce of your choosing.
Recipe Tips
In this recipe, we make the ravioli dough by hand. Sure, you could use your stand mixer and let the machine knead the dough for you. But to me (and to my husband who lived in Italy for 2 year), homemade pasta is traditionally made by hand.
Tools for Making Homemade Ravioli
- Ravioli maker (this is what I have and use) There are different methods people use for stuffing and making the ravioli. I use a ravioli maker. You can also use a hand stamp ravioli or feel free to free-hand it by cutting your own squares and then cinch the edges together using the tines of a fork.
- Ravioli press: You can do square or circular ravioli
- Ravioli roller
- Pasta sheet attachment
Making the Homemade Ravioli Dough
Make the flour well BIG because you’ll be adding 5 eggs and 3 egg yolks to that well. When I made this ravioli recipe last year, I made the mistake of having the well be too small. Let’s just say we had eggs drizzling over the flour wall.
You can beat the eggs with a fork prior to pouring them into the flour well or you can wait and lightly beat the eggs once they’re in the flour well — it doesn’t matter.
Once the eggs are incorporated into the flour and you’ve kneaded it, if the dough is too wet and it’s sticking to your work surface, add a little bit of flour to the dough. On the contrary, if the dough is too dry, add a spritz of water to the dough.
Rolling out ravioli dough: To achieve an even thickness, I use my kitchen aid pasta roller attachment and it’s amazing. If you don’t have one, it’s definitely something to consider purchasing. But once again, it’s not necessary. You can make homemade ravioli with an old fashioned rolling pin, just roll the dough until super thin.
If making the full batch of ravioli, section the dough into 8, and then roll out each section with the pasta attachment. If making the half batch of ravioli dough, section the dough into 4-6 sections.
If you use a pasta sheet roller: Dust the dough with flour before running it through the pasta sheet roller, this prevents the dough from sticking. You can definitely run the ravioli dough through the #3 setting more than once. You really have to gauge how the dough feels.
Flouring the ravioli mold: What I found to work the very best was to have a pile of flour on my counter and then dip the metal ravioli frame into the flour so that it was covered in flour.
How to fill homemade ravioli: I use a really small cookie scoop for ease in measuring the filling.
Storing
Ravioli dough will keep in the refrigerator for several days. Cooked, homemade ravioli will keep in the fridge for 3-4 days.
Freezing: Flash freeze the uncooked and filled ravioli on a wax paper lined baking sheet for about 1 hour, then transfer the frozen ravioli to a freezer-safe ziplock bag and store in freezer for up to 3 months. Boil and cook as normal straight out of the freezer.
FAQs
I use a ravioli maker, so once filled and topped with the dough, I use my rolling pin over the dough to crease the edges. If you use a ravioli stamp, that will crease the edges. If you are doing it by hand with no tools, I’d recommend using some kind of dough crimper or the prongs of a fork to seal the ravioli edges.
Nope! Once all the raviolis are made, you can start cooking them right away.
Bring a pot of water to boil and add about 8 raviolis into the water at a time. They’ll cook for about 3-4 minutes and will float to the top when they are done.
Italian Recipe Favorites
Did you make this recipe? I’d love to hear about it! Click here to leave a rating and review, or scroll below the recipe card and do so there.
Stay up-to-date by following us on Instagram, Facebook, and Pinterest.
How to Make Ravioli
Ingredients
Full Batch
- 4 cup all purpose flour
- 1 teaspoon kosher salt
- 5 large eggs
- 3 large egg yolks
For half the recipe:
- 2 cups all purpose flour
- 1/2 teaspoon kosher salt
- 3 large eggs
- 2 large egg yolks
Equipment
Instructions
- To make the ravioli dough, mix the flour and salt together on a clean work surface. Form into a 10-12 inch diameter mound.
- Using your hands, make a well in the flour and salt mixture. Pour the eggs and egg yolks into the well. Using a fork, gently beat the eggs and yolks. Once you’ve done that, slowly incorporate the flour into the eggs.
- If the dough is too wet and it’s sticking to your work surface, add a little bit of flour to the dough. If the dough is too dry, add a spritz of water to the dough.
- Form the dough into a ball. Begin kneading it for 10 minutes. (Pushing the dough with the heel of your hand, and then rotating it). You’ll know the dough is ready when you press into it and it springs back. The dough should have a nice smooth appearance to it.
- Wrap the dough with plastic wrap and let it sit for 30 minutes at room temp. (If you aren’t using the dough right away, place it in the refrigerator).
- Roll out the ravioli (I use my kitchen aid pasta roller attachment). Roll out to about 1/8” to 1/16" thick. (Depending on how thin/thick you want your pasta to be).
- Using a ravioli mold, place the sheet of dough over the ravioli mold (following instructions for the ravioli mold), gently create a small divot in the dough. Fill each cube with 1 tablespoon of filling. Cover with dough. Use a rolling pin and roll overtop the dough so that it seals. Turn the mold over and tap it on the counter to release the ravioli. Use a knife to separate any ravioli that didn’t separate.
- Transfer the ravioli to a baking sheet lined with parchment paper that has been dusted with flour. Continue rolling out the pasta dough and filling the ravioli until all of the dough and filling has been used.
Cooking the Ravioli
- Bring pot of water to boil. Once boiling add 1 tablespoon of salt to the water. Add some of the ravioli to the water. Don’t overcrowd. You’ll want to do this in batches. Cook for 3-4 minutes or until they float to the top. Using a slotted spoon, transfer them to a lightly oiled plate or add them to whatever sauce you plan on serving with them.
Notes
- Ravioli maker (this is what I have and use) There are different methods people use for stuffing and making the ravioli. I use a ravioli maker. You can also use a hand stamp ravioli or feel free to free-hand it by cutting your own squares and then cinch the edges together using the tines of a fork.
- Ravioli press: You can do square or circular ravioli
- Ravioli roller
- Pasta sheet attachment
This recipe was originally published on Nov. 3, 2019. It was republished on Aug. 17, 2021, to include additional information and/or photos.
 Welcome to this delicious corner of the internet! Here I share the recipes my family loves.


63 Comments on “How to Make Ravioli”
Can I freeze the dough ball? I made too much and used all of my filling, but don’t want to waste the dough.
Absolutely! Dust the ball of dough with flower before wrapping it tightly in plastic wrap – you may wish to do a couple of layers. It should stay good in the freezer for 3-6 months. When you want to use it, let it thaw on the counter.
Can I make the dough in my kitchen aid bowl and then use the attachment roller??
Instead of me kneading it by hand I have Severe arthritis and as is my husband has to help me with the kitchen to lift bowl etc
Gretchen, absolutely! That should work great. Just be careful not to over-knead the dough. Good luck!
The recipe was so easy to follow and was so delicious even though I didn’t get the texture perfect. We cooked them on boil for approximately 4 minutes in small batches, but our noodle consistency still came out pretty tough. The texture of the dough was perfect like playdough. But when it came to rolling out in sheets and handling for filling and pressing the two layers together the sheets of dough did start to get hard.
Is there a tip or maybe an error you can think of for this happening? We will definitely be re attempting to get this yummy combo perfected!!
Hi Adrianna, I haven’t run into this issue before. The only thing I can think of is that you may have used just a *touch* too much flour. That’s probably the most likely reason why your dough was getting hard when you were rolling it out.
If I am adding ground beef to my filling, should I cook it before adding it in the filling or do I add raw ground beef and let the boiling water cook it when I boil the ravioli? Sorry if this is a silly question, I’m still learning how to cook!!
Hi Sarah, this is not a silly question at all! Because the pasta cooks quickly, you should cook meat fillings beforehand. Thanks for asking, hope this helps!
Earlier this week I made spaghetti pasta and my wife and daughter loved it. While we were eating they suggested I try ravioli next and I immediately said no, it’s too difficult. Unfortunately my mind wouldn’t stop thinking about their suggestion, so I decided I would. Found your recipe for the pasta and the butternut squash filling and gave it a try. My wife loves it, said it was better than the spaghetti pasta. Thank you for sharing your recipe and explaining every detail. Looking forward to trying more of your recipes.
I’m glad the step-by-step instructions helped you Michael. The butternut squash filling is my favorite. Excited for you to try more recipes!
I really appreciate the thorough explanation on how to make the dough and the ravioli. This is the second recipe I used, and your recipe tasted delicious and was easy to prepare.
So happy to hear that, Sarah! Thanks for coming back to leave a star rating!
Could you show me the ravioli attachments on the kitchen aide, I bought mine 40years ago lost the pamphlet that goes with it please
You should be able to find it online with an easy google search.
approx how many ravioli’s should this recipe make?
About 50.
I’m on 60 ravioli and I still have dough left. Making the dough as thin as possible with a pasta maker. These are delicious!
Wow! So glad you love them, Noelle!
The dough turned out too sticky and even when I added more flour it never was the right consistency to put through my sheet roller. I ended up having to throw it out 🙁
Hi Nikki! Let me help you troubleshoot. First, if you notice on step five, I mention it can take some time for the dough to come together. Then, if you still find it needs more flour, then add more. You’ll also be kneading the dough with your hands for 10 minutes, which will help the gluten to develop and bind, providing better structure. And be sure to chill the dough in the fridge as instructed. These tips will help ensure your dough is ready for the roller!
Thank you for this recipe and clear instructions! This was my first time making pasta and it turned out fabulously. It made more than I expected, and I’m super happy to have both leftovers and some to freeze for another time!
Tasty, but I think kneading for 10 minutes made it tough.
Can this dough be used to make noodles such as spaghetti, lasagne, etc?
I’ve made just about every pasta recipe you can find and I can honestly say this is the best my pasta has ever turned out. It seems to be the perfect combo of eggs to flour and I’ve made multiple batches to freeze since finding it. Highly recommend this recipe!!!
*** I have also made this using fresh duck eggs. Came out BEAUTIFULLY!! But I did reduce the whole eggs to 4 instead of 5 just due to the eggs being larger.
I did have to add a few drops of water to get the dough to bind a little more but now I am at the 30 minute mark. The dough bal is firm yet bounced from my finger imprint. I have the kitchen aid attachment and I have a fluted pie crust cutter so I will be using that to make my squares and the small ice cream scoop is a great Idea! Can’t wait for supper tonight!!!!
Yay! Glad you were able to figure it out. Thanks for your comment.
First time making my own ravioli and this recipe turned out absolutely amazing!
Great job.