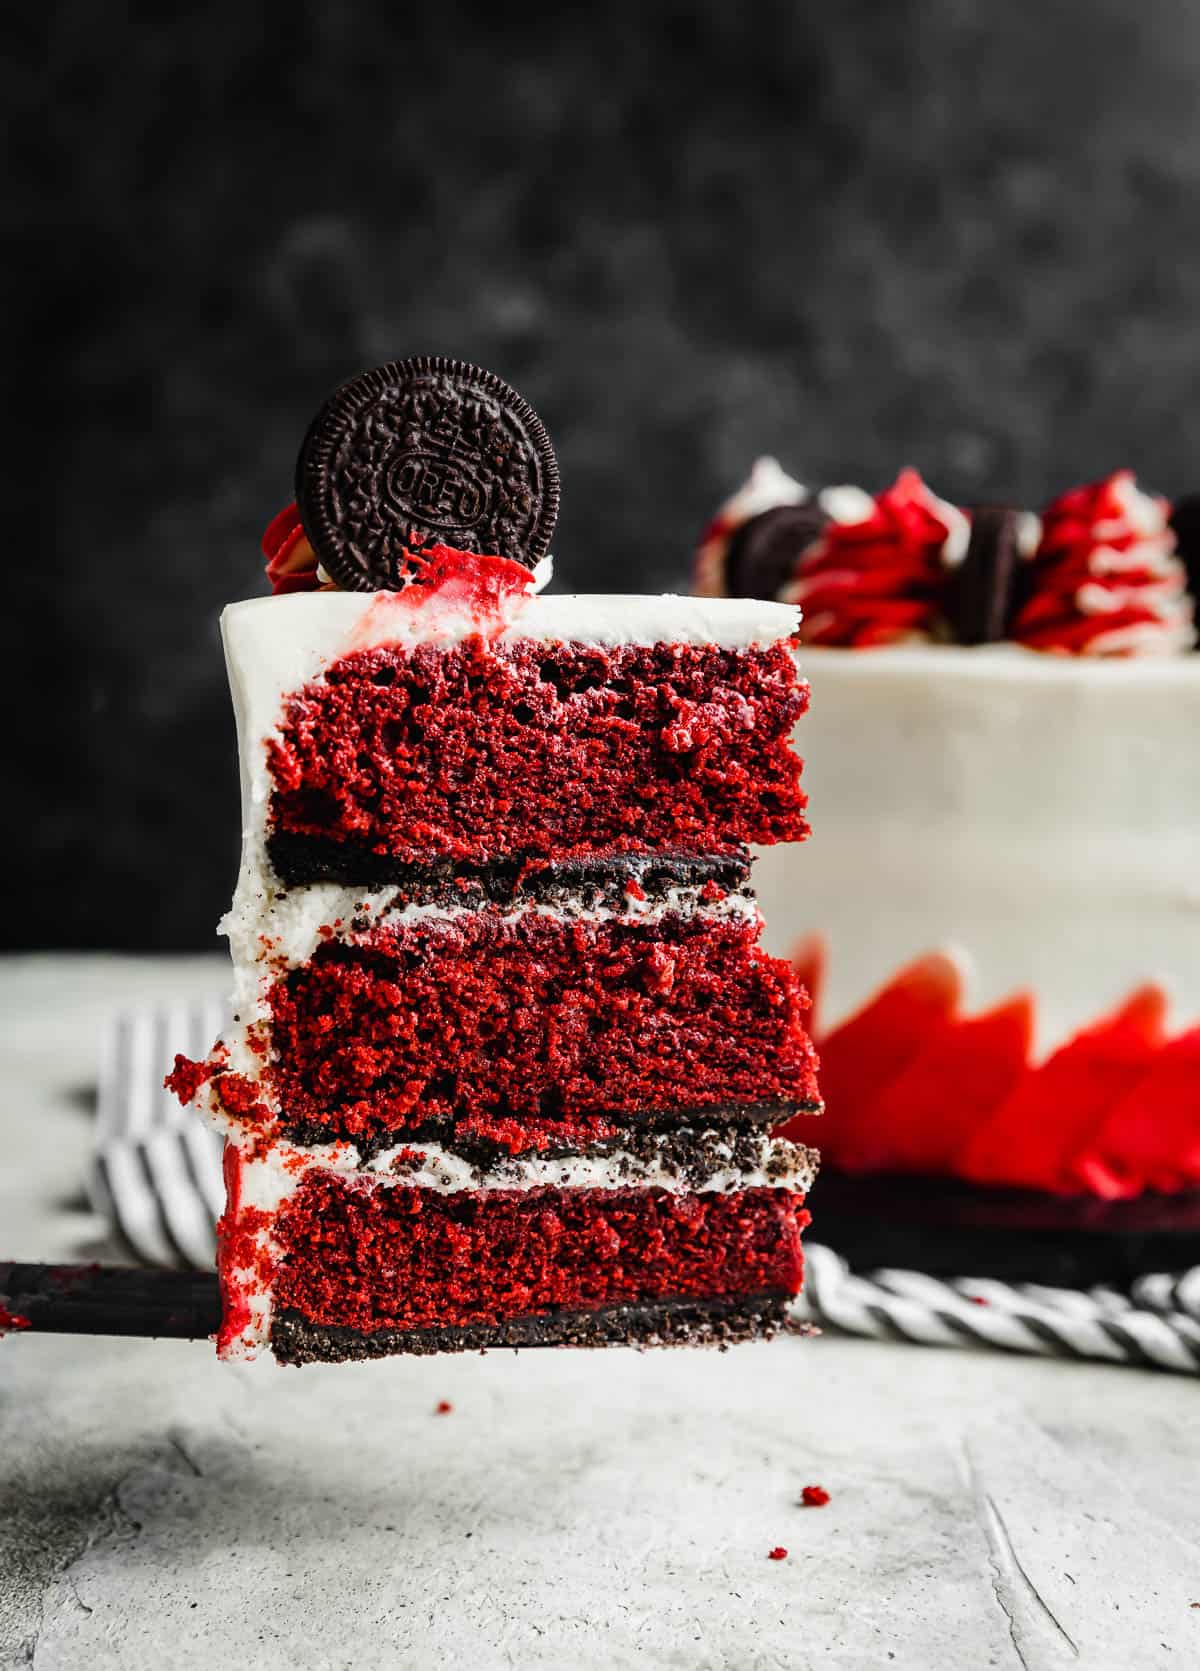
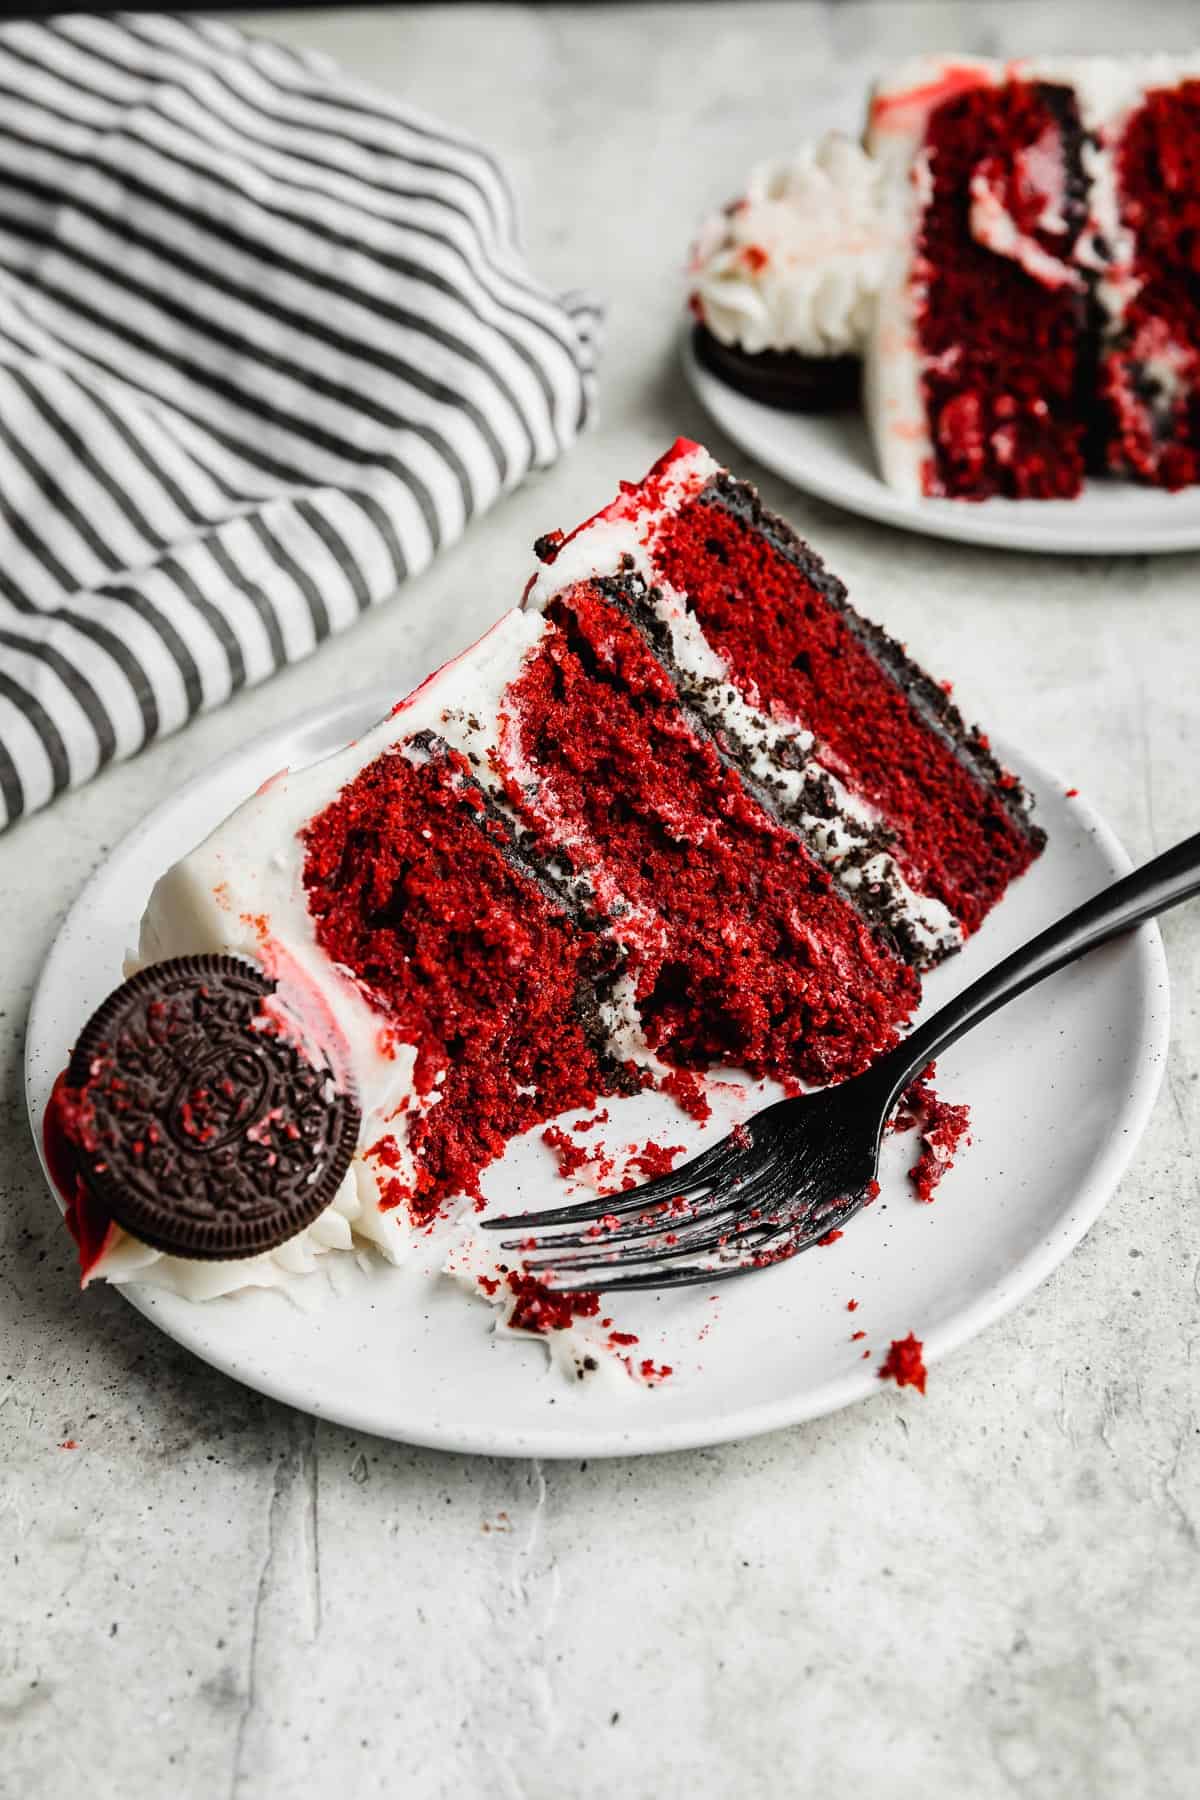
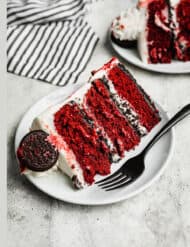
Oreo Red Velvet Cake
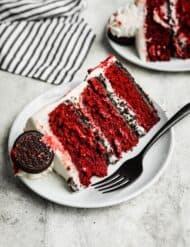
This Oreo Red Velvet Cake is so moist and tender with a delicious variety of textures and flavors. The Oreo crust is the perfect thickness and adds a rich black cocoa and Oreo flavor to the cake. The soft and moist red velvet cake layers have a rich, prominent red velvet flavor that is topped off with a smooth and velvety cream cheese buttercream frosting.
I’m a big fan of Oreo Desserts and I love a good Old Fashioned Red Velvet Cake, so of course I loved the idea of an Oreo Red Velvet Cake recipe. It’s like the best of both worlds! After I took a bite of it, I knew I was in flavor heaven!
Why This Recipe Works
- Sturdy cream cheese buttercream frosting. The key to making a cream cheese frosting that is sturdy enough to hold up between cake layers is to use part cream cheese and part butter. If it were just cream cheese, the frosting would be too soft.
- Rich, prominent red velvet flavor. Red velvet cake has an acidic element to it due to the buttermilk and vinegar in the cake which brightens the flavor and balances well with the sweetness of the cake. Red velvet also has a subtle chocolate flavor. The balance of vinegar, vanilla and chocolate in this cake provides the perfect red velvet flavor.
- Easy-to-cut crust. Often cakes with crust have such a thick, hard crust that it’s difficult to cut into. This Oreo crusted cake has the perfect thickness of crust — just thick enough to really bring that crunch and flavor but not too thick that the crust is hard to cut into and the flavor is overpowering.
Ingredient Notes
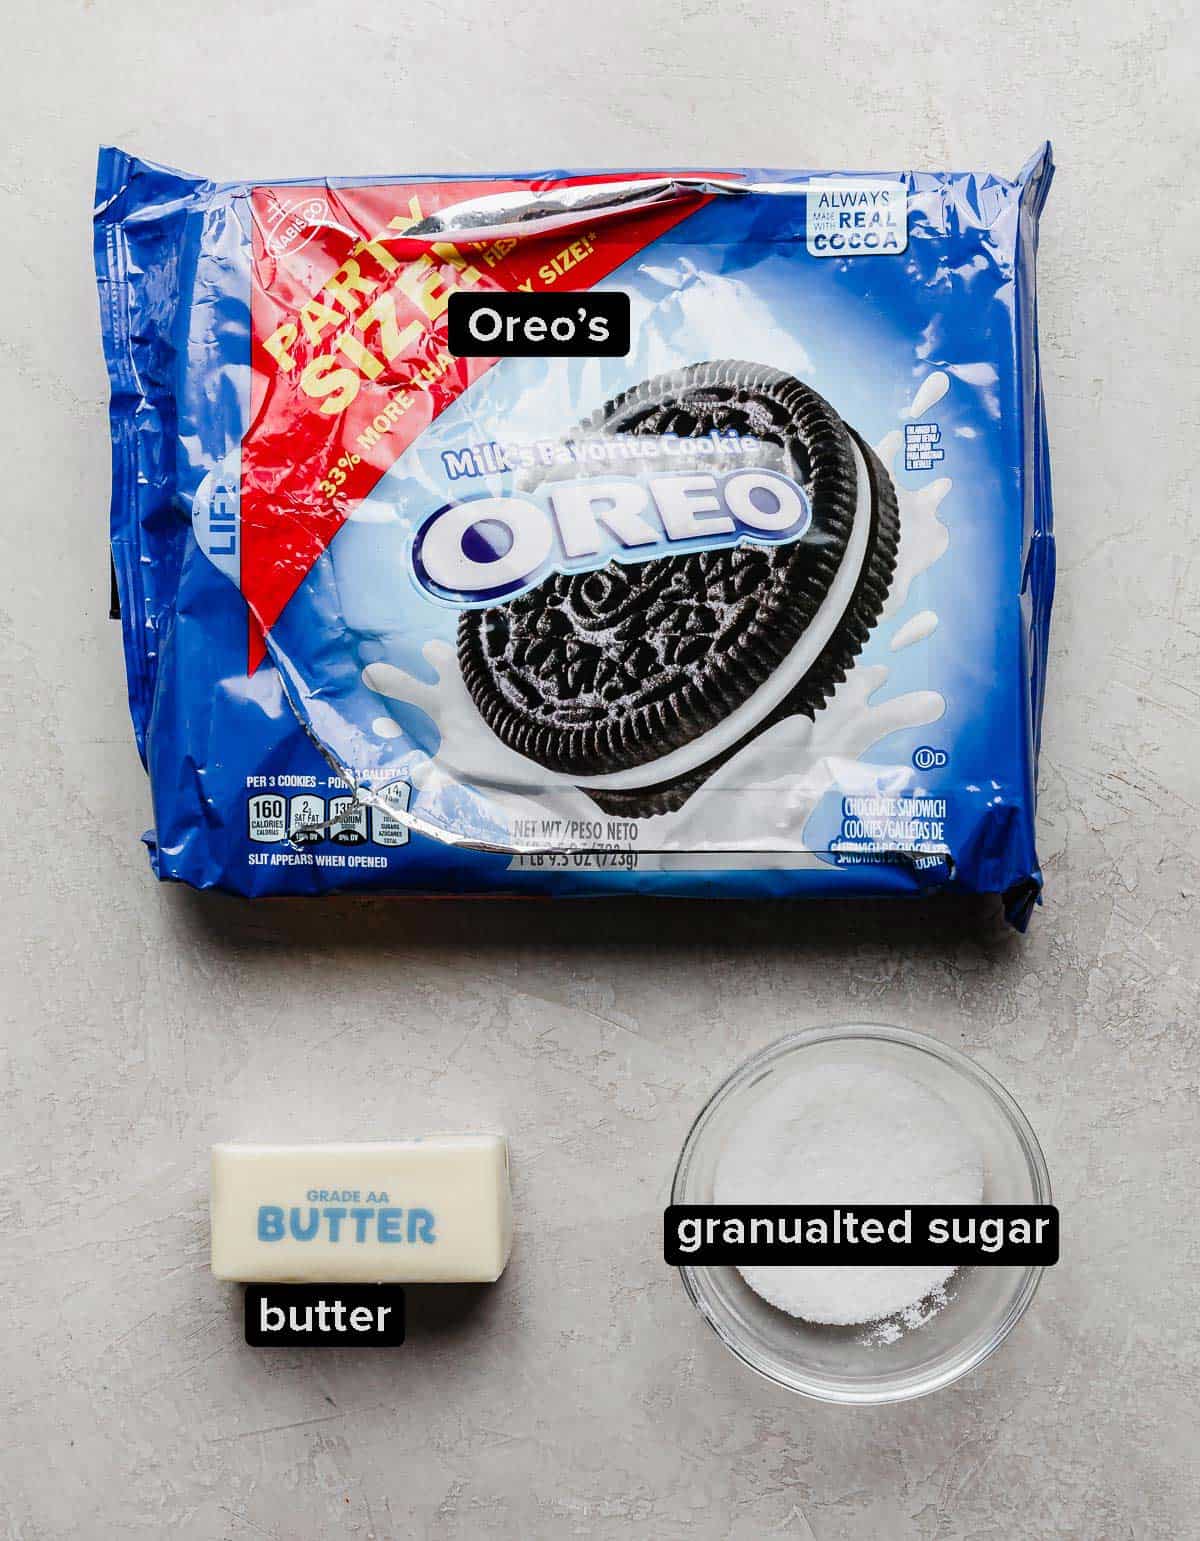
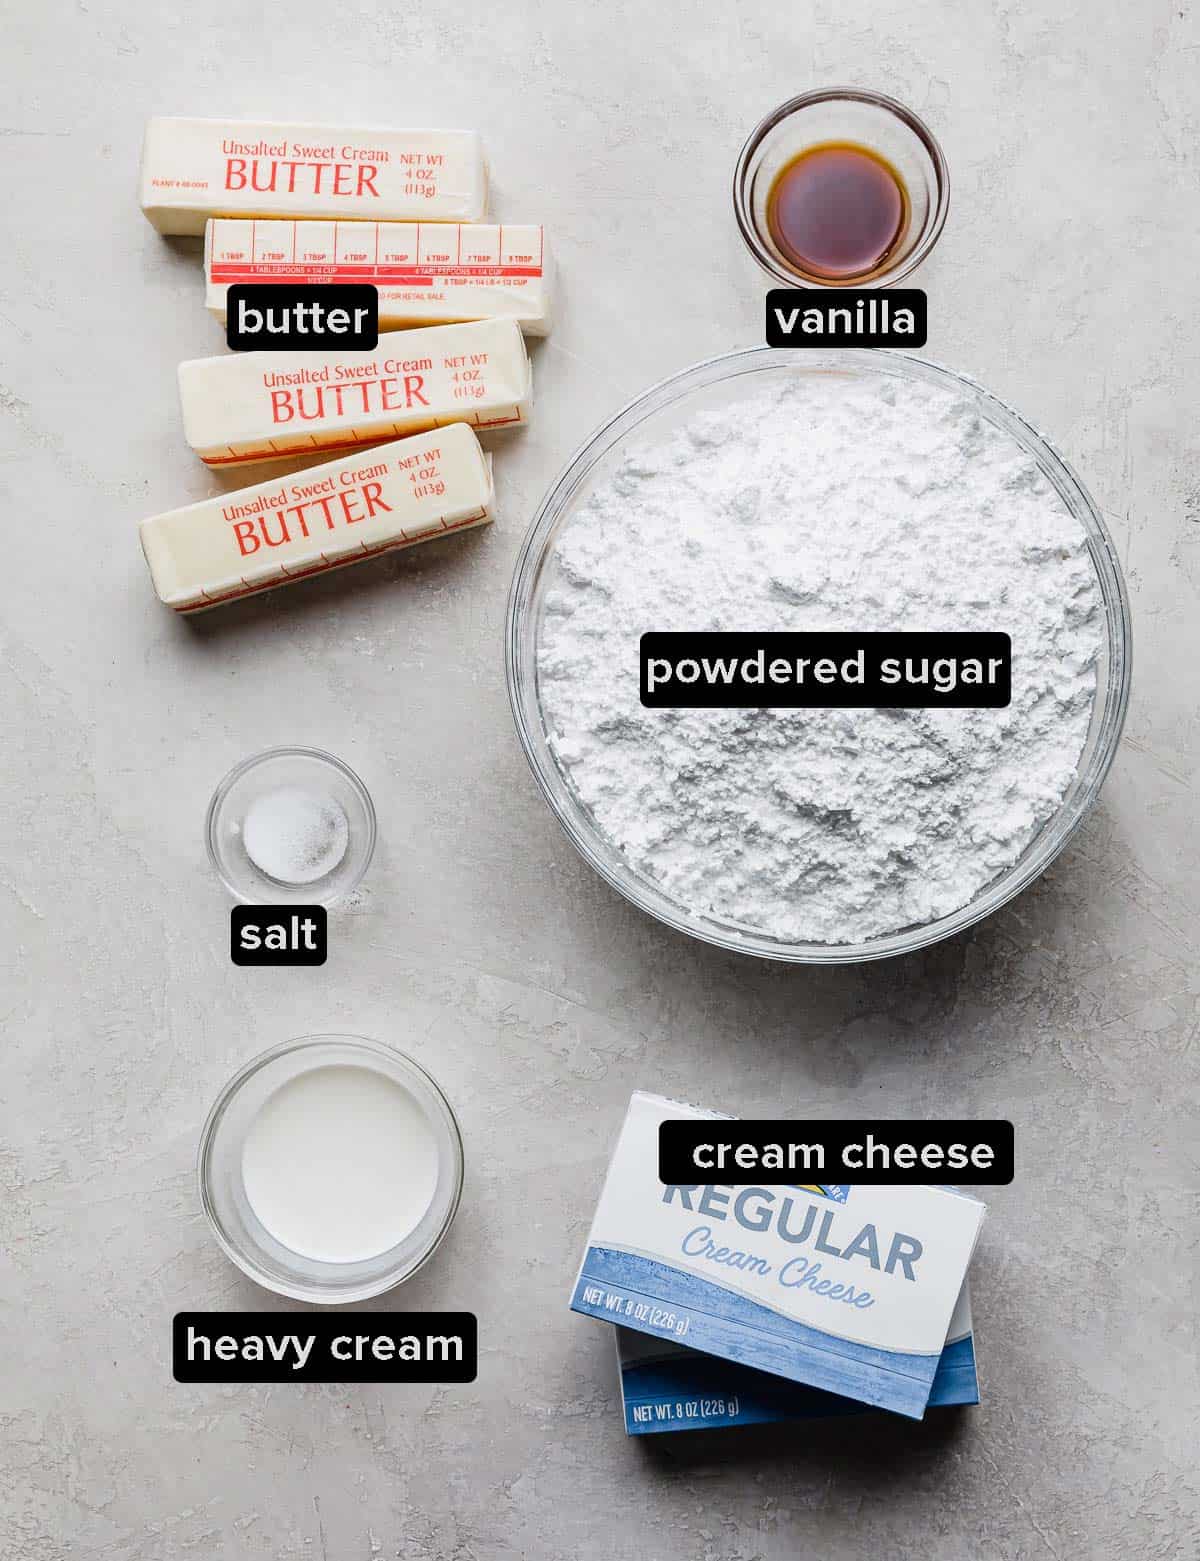
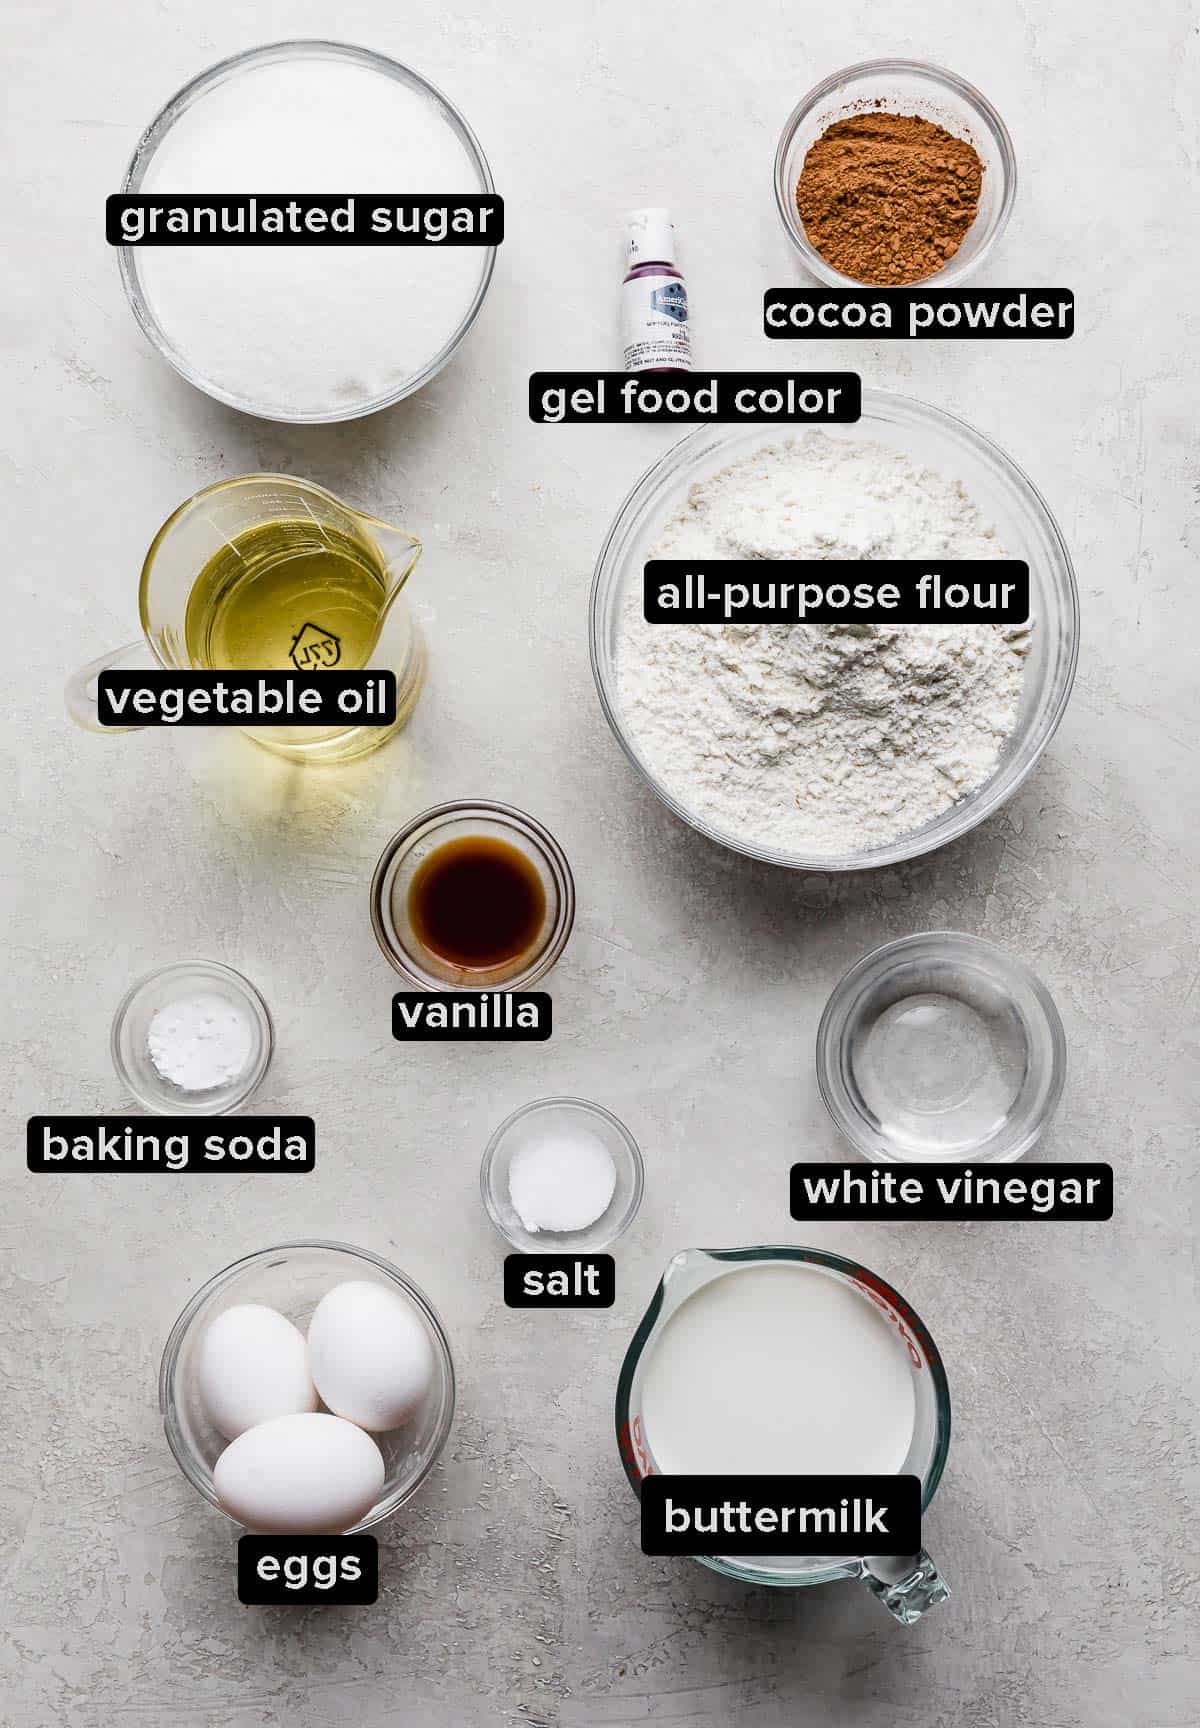
- Oreos: I used about 40 Oreos to get the amount I wanted for the Oreo crust.
- Unsweetened Cocoa Powder: Unsweetened cocoa powder (also referred to as natural cocoa powder) is acidic and therefore paired with a base (such as baking soda). This is just enough cocoa powder to give us that subtle chocolate flavor, but not too much that it tastes only like a chocolate cake. We still want that nice red velvet flavor to come through.
- Baking Soda: Cakes that use unsweetened cocoa powder will typically call for baking soda since unsweetened cocoa powder is acidic and baking soda is a base — causing a nice chemical reaction that gives us a lift in the cake.
- Buttermilk: Buttermilk is a key ingredient in red velvet cake because it helps provide the acidic nature of the cake. Red velvet cake recipes typically have white vinegar and a buttermilk paired with vanilla and some cocoa powder (a smaller amount of cocoa powder than you’d see in an all chocolate cake).
- Vegetable Oil: Using vegetable oil in cakes instead of butter will give a much more moist and tender cake texture. This is because vegetable oil is a liquid at room temperature.
- Eggs: Be sure to use room temperature eggs so they incorporate into the batter more easily.
- White Vinegar: I used white vinegar because I didn’t want an added flavor like apple cider or red wine to conflict with the other flavors in the cake. White vinegar in red velvet cake helps bring that acidic flavor through. Don’t worry though! The sweetness of the cake balances the acid. This isn’t an acidic tasting cake!
- Red Gel Food Coloring: Of course we want that beautifully deep red velvet color for our Oreo and red velvet cake!
Step-by-Step Instructions
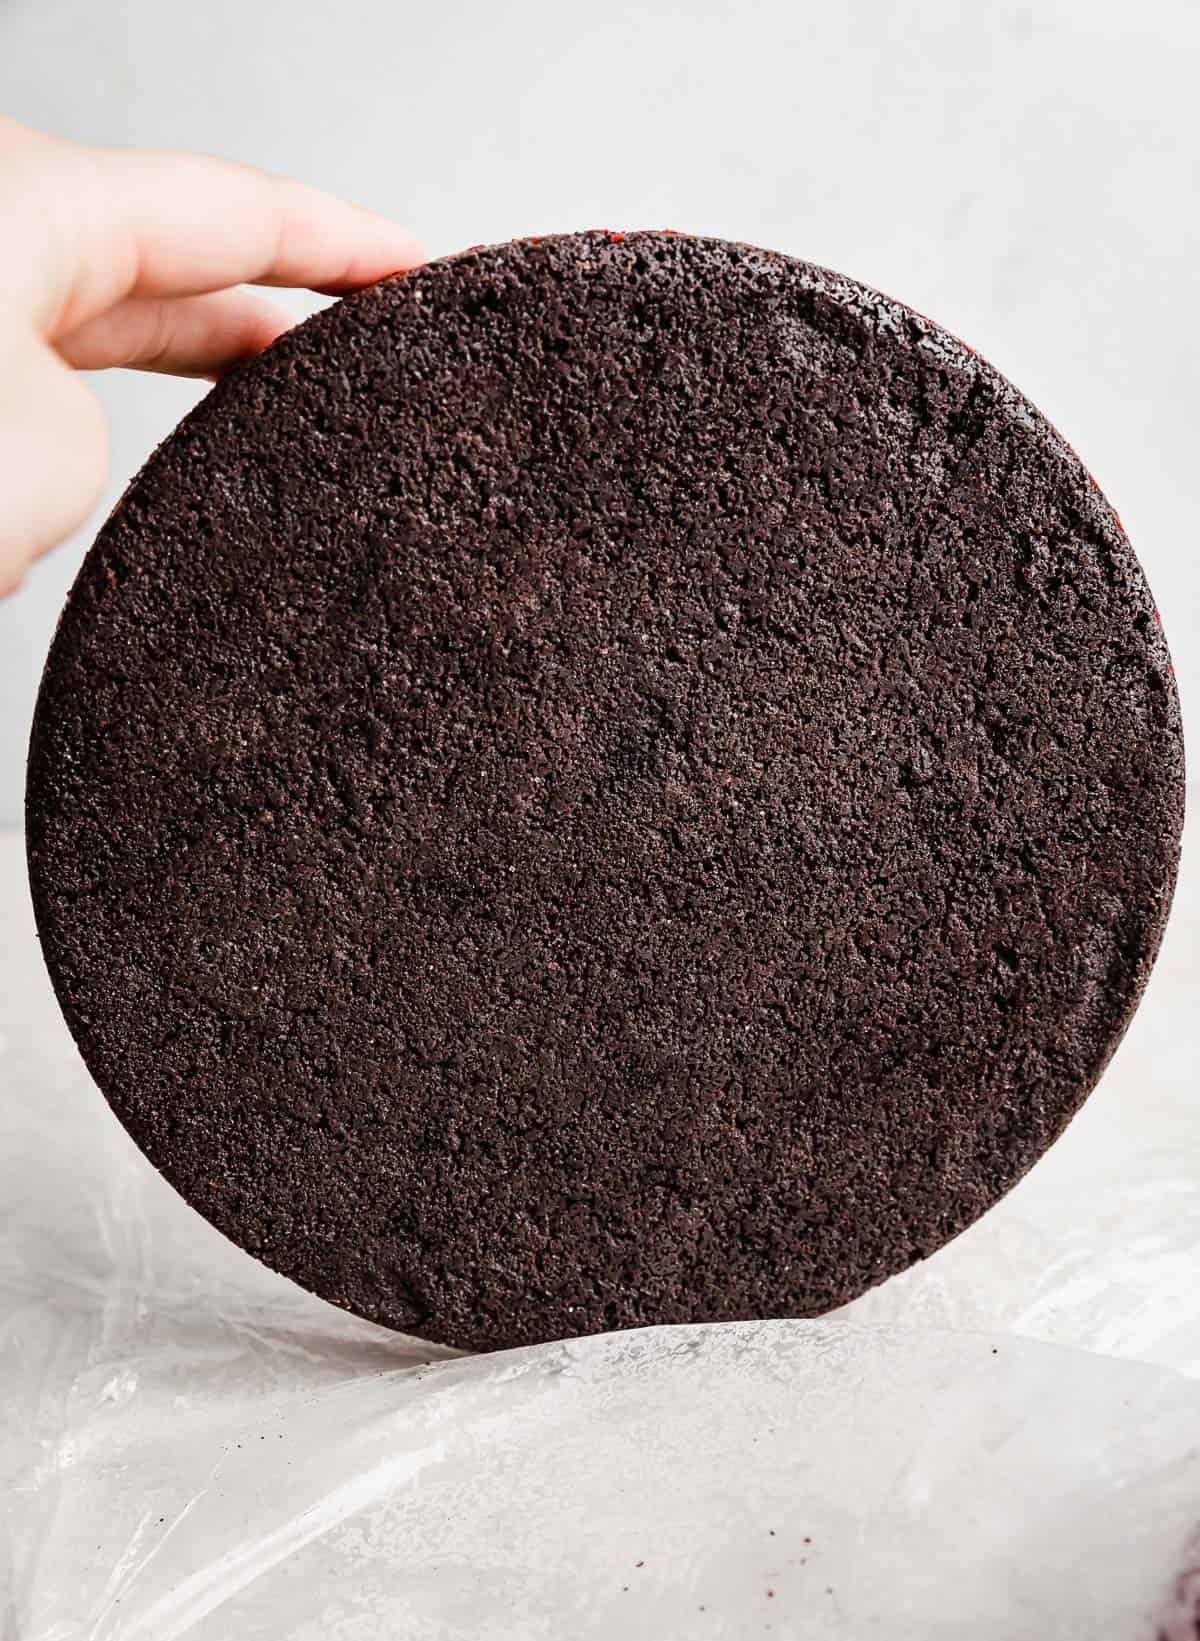
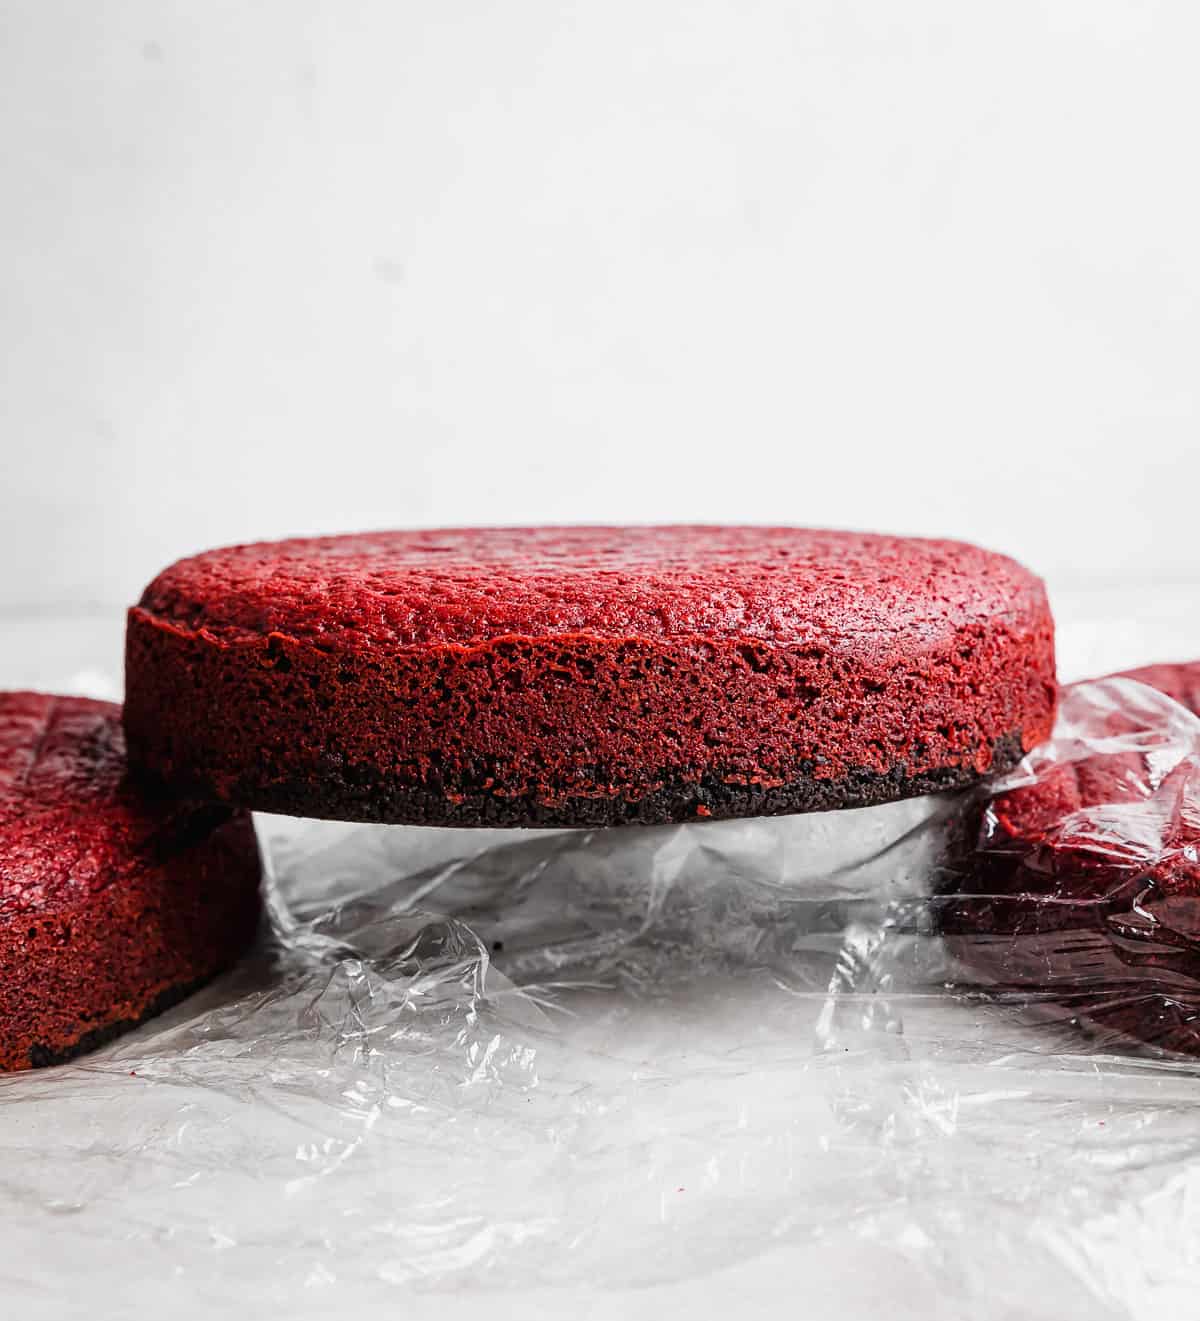
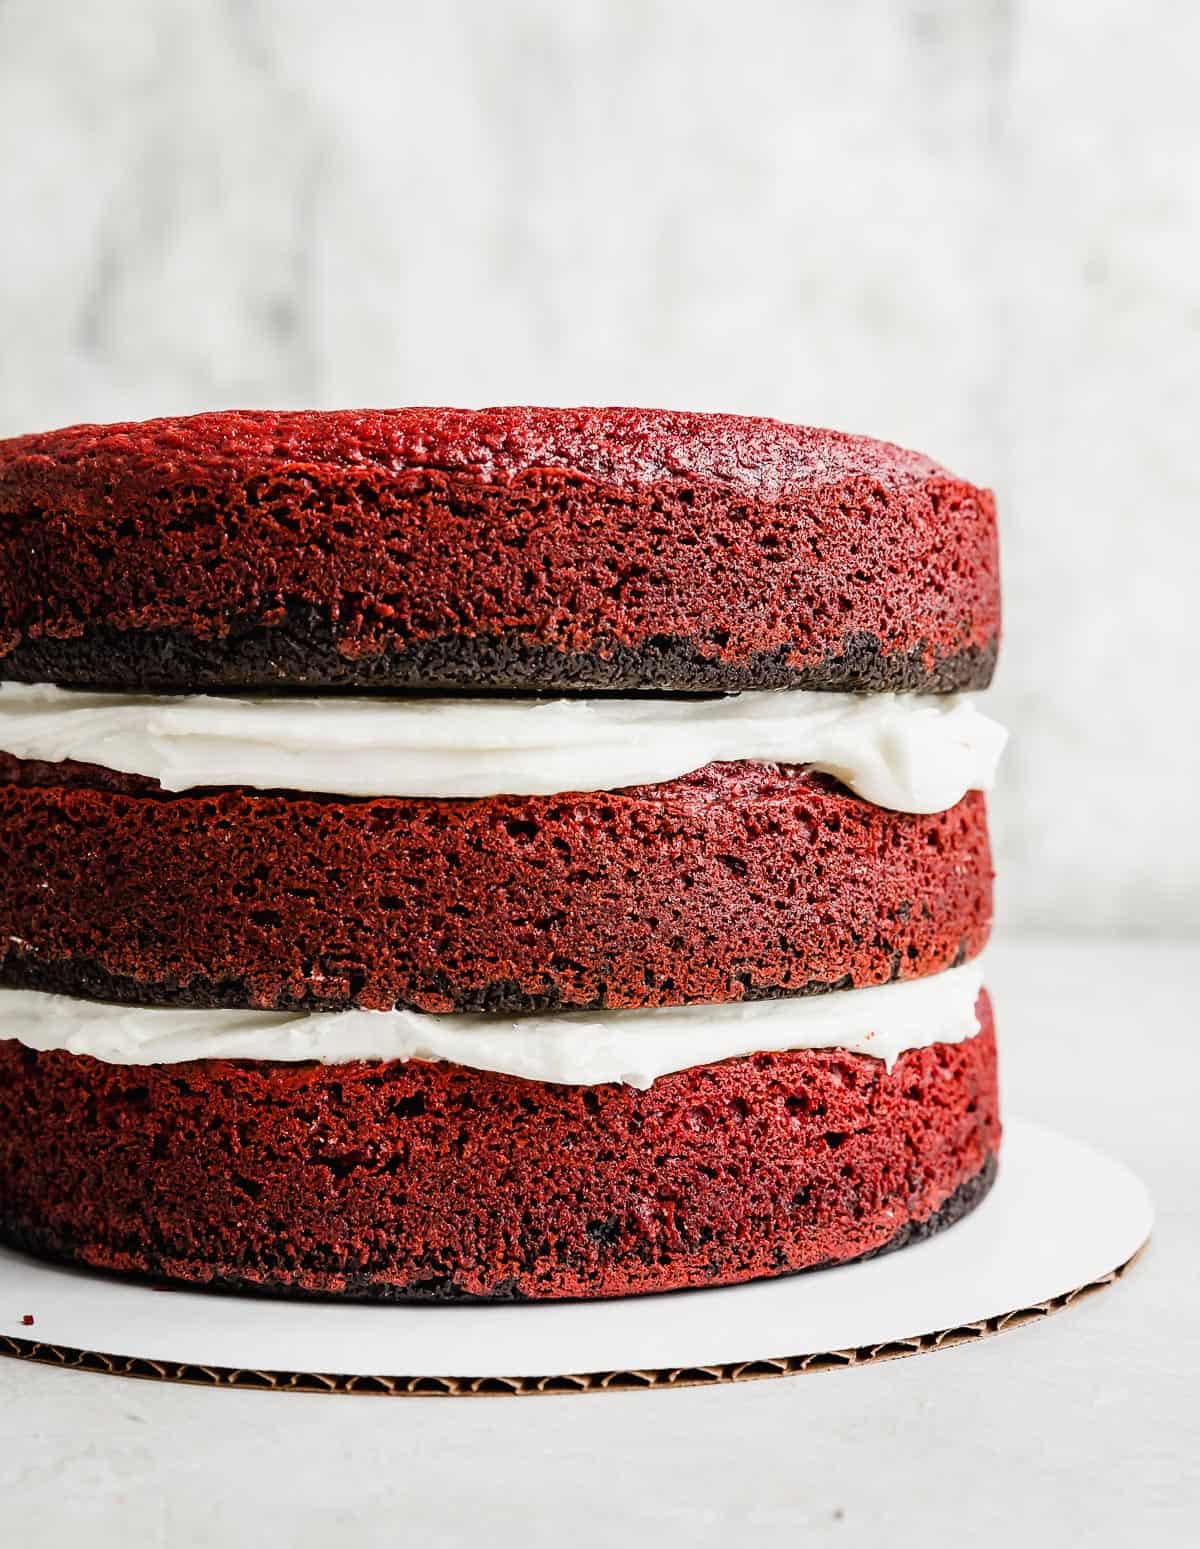
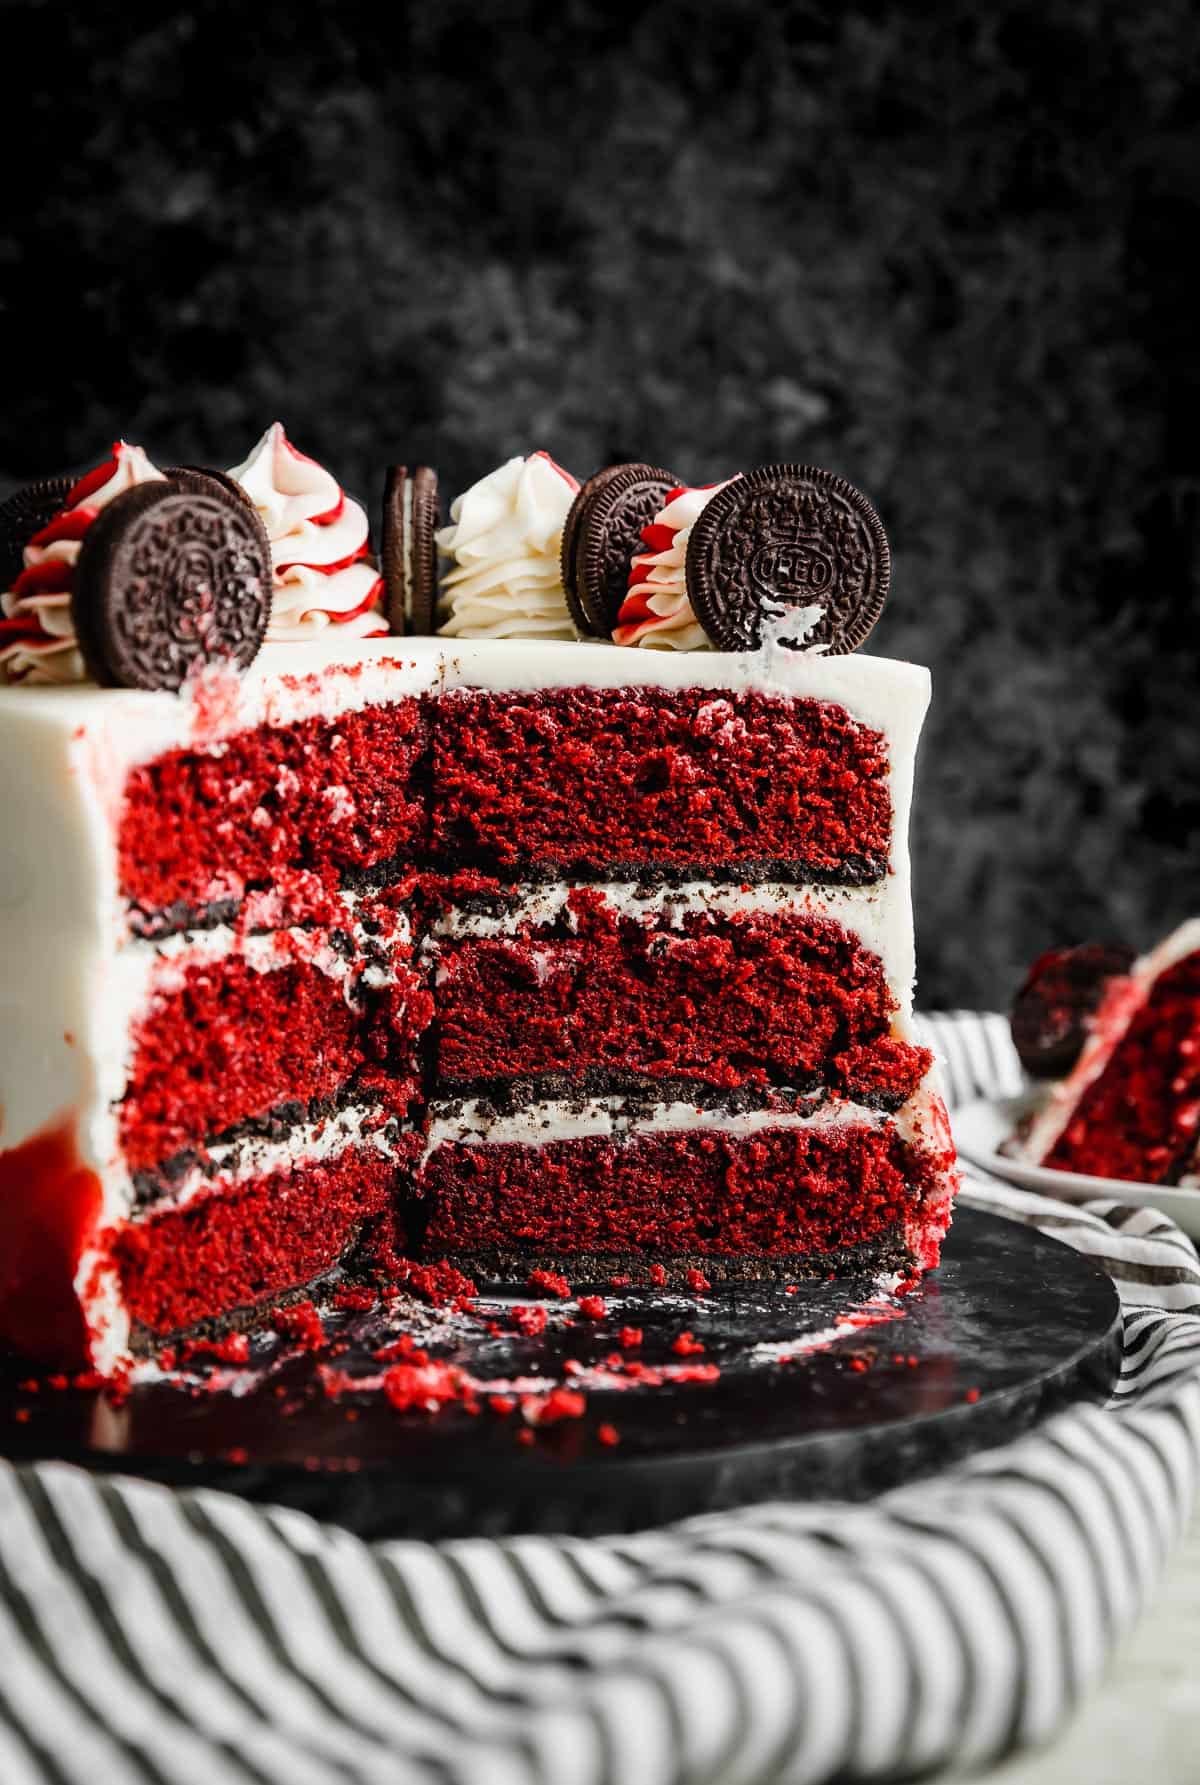
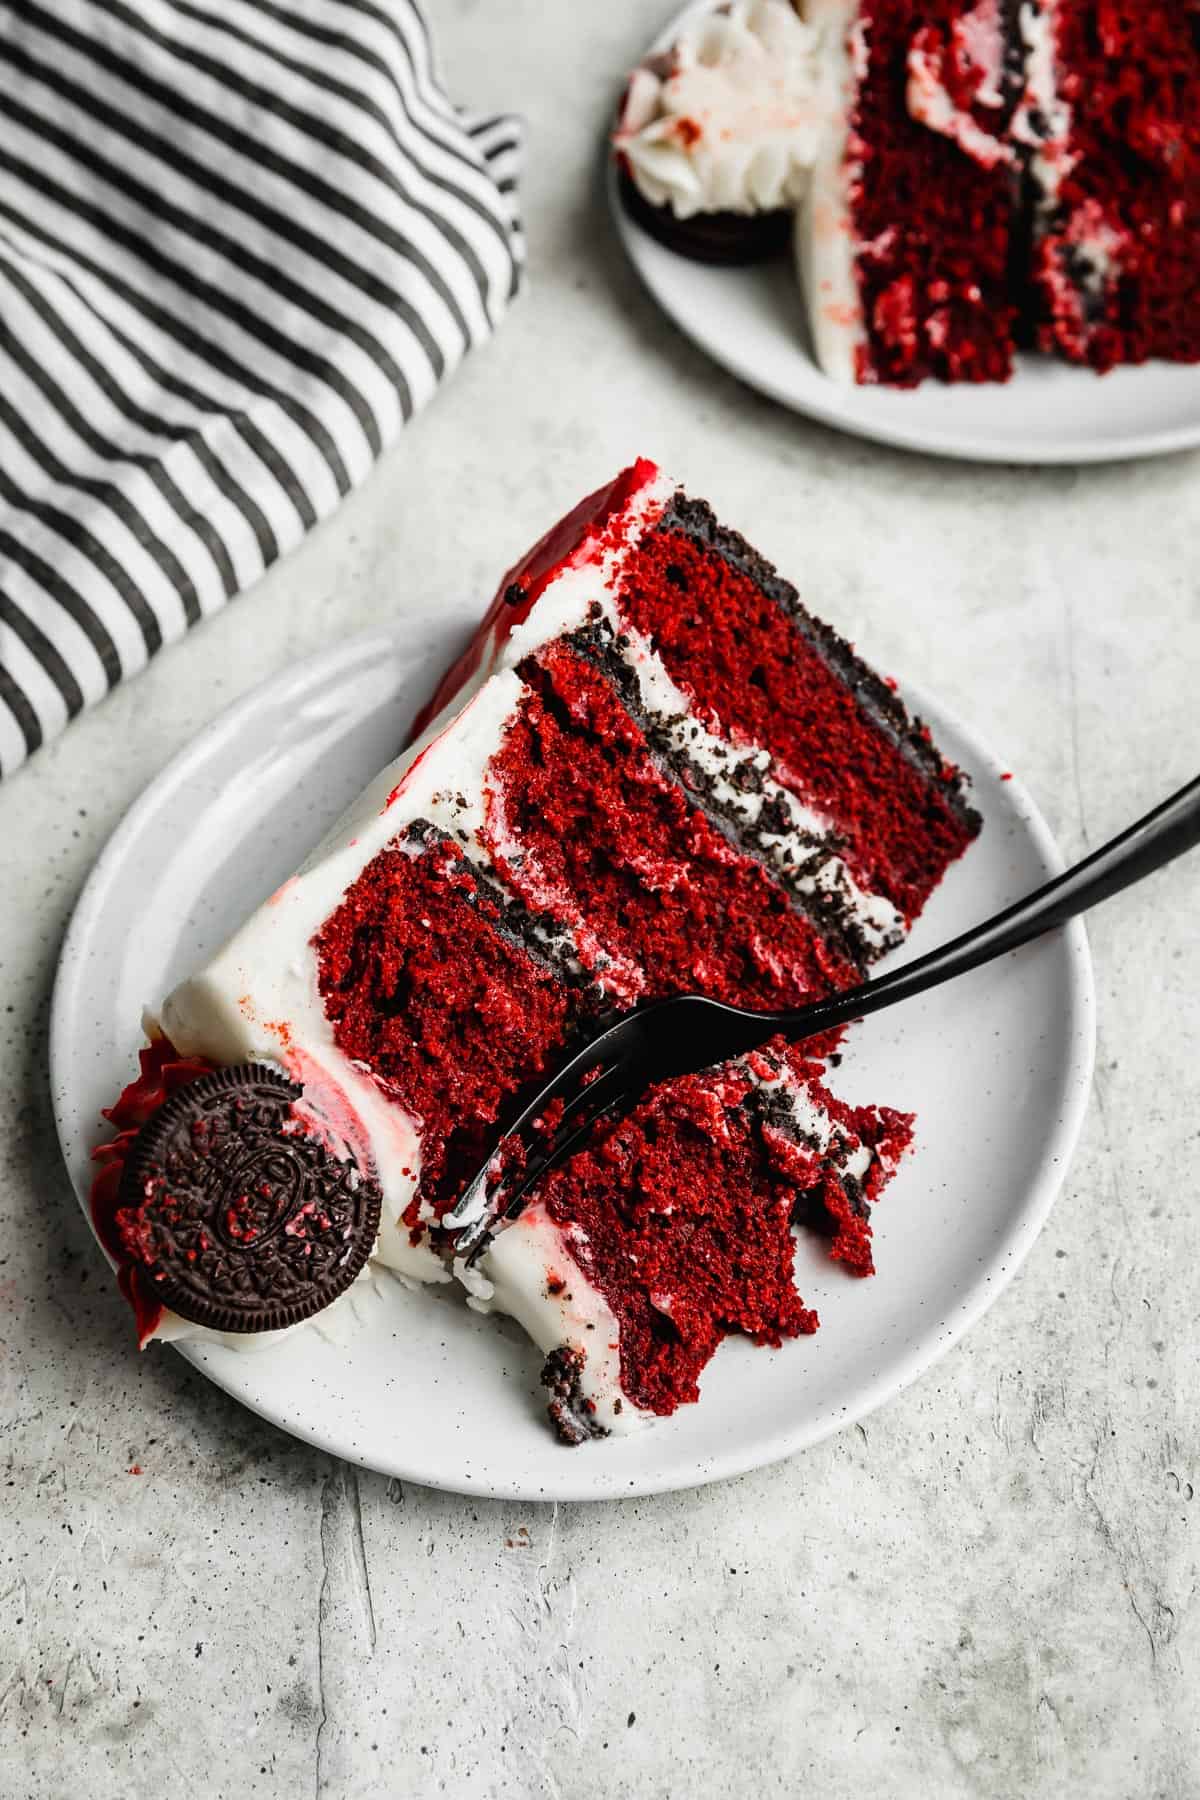
- Make the Oreo crust. Mix the Oreo crumbs, sugar and melted butter. Press the mixture into three 8-inch round cake pans that have been sprayed with nonstick spray and the bottom lined with parchment paper. Bake at 325ºF for 3 minutes.
- Make the red velvet cake layers. Whisk the dry ingredients until combined. In the bowl of a stand mixer with the whisk attachment, combine the wet ingredients until well combined. Switch to the paddle attachment and add the dry ingredients 1 cup at a time to the wet ingredients with the mixer on low speed until just combined. Divide the batter among the three cake pans, pouring directly on top of the Oreo crust. Bake at 325ºF for 35-45 minutes or until a toothpick in the center comes out with a few moist crumbs.
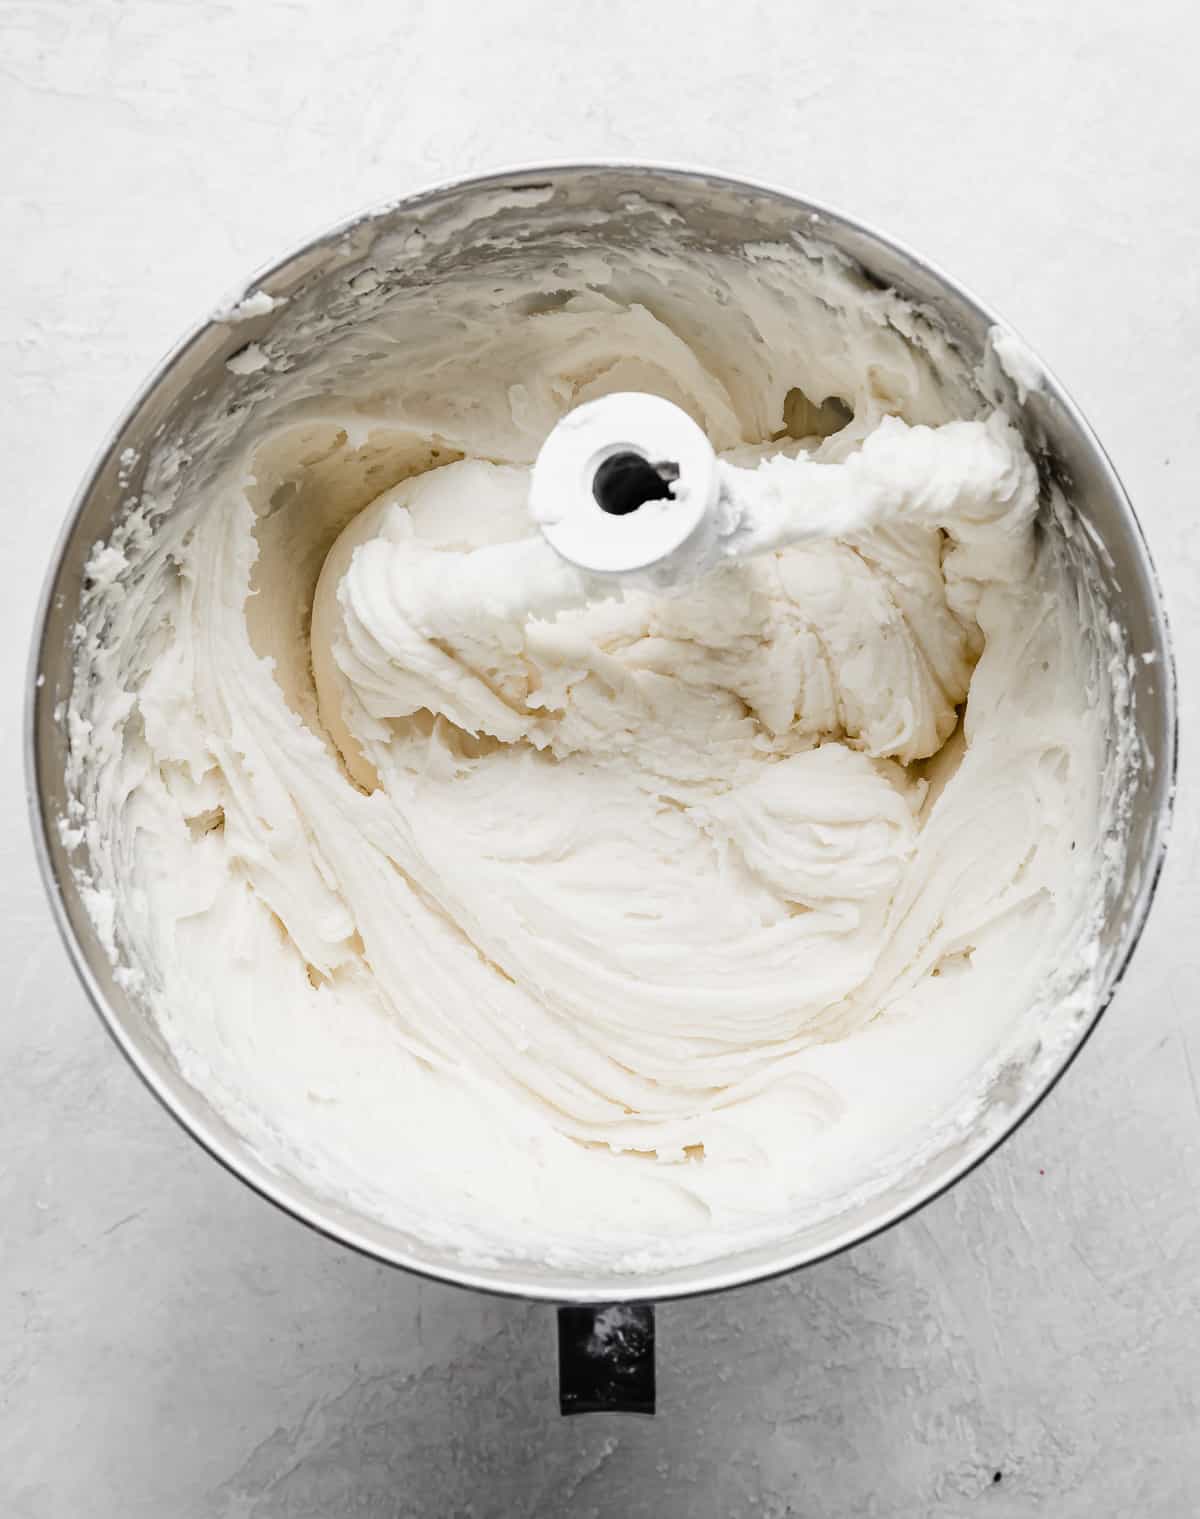
- Make the cream cheese buttercream. Beat the butter, cream cheese, and salt (in the bowl of a stand mixer with the paddle attachment) until it’s smooth and light in texture and color. Add the powdered sugar, a couple cups at a time, mixing well before adding more. Add a tablespoon of heavy cream as needed to keep the frosting smooth and not too stiff. Repeat until all powdered sugar and cream are added.
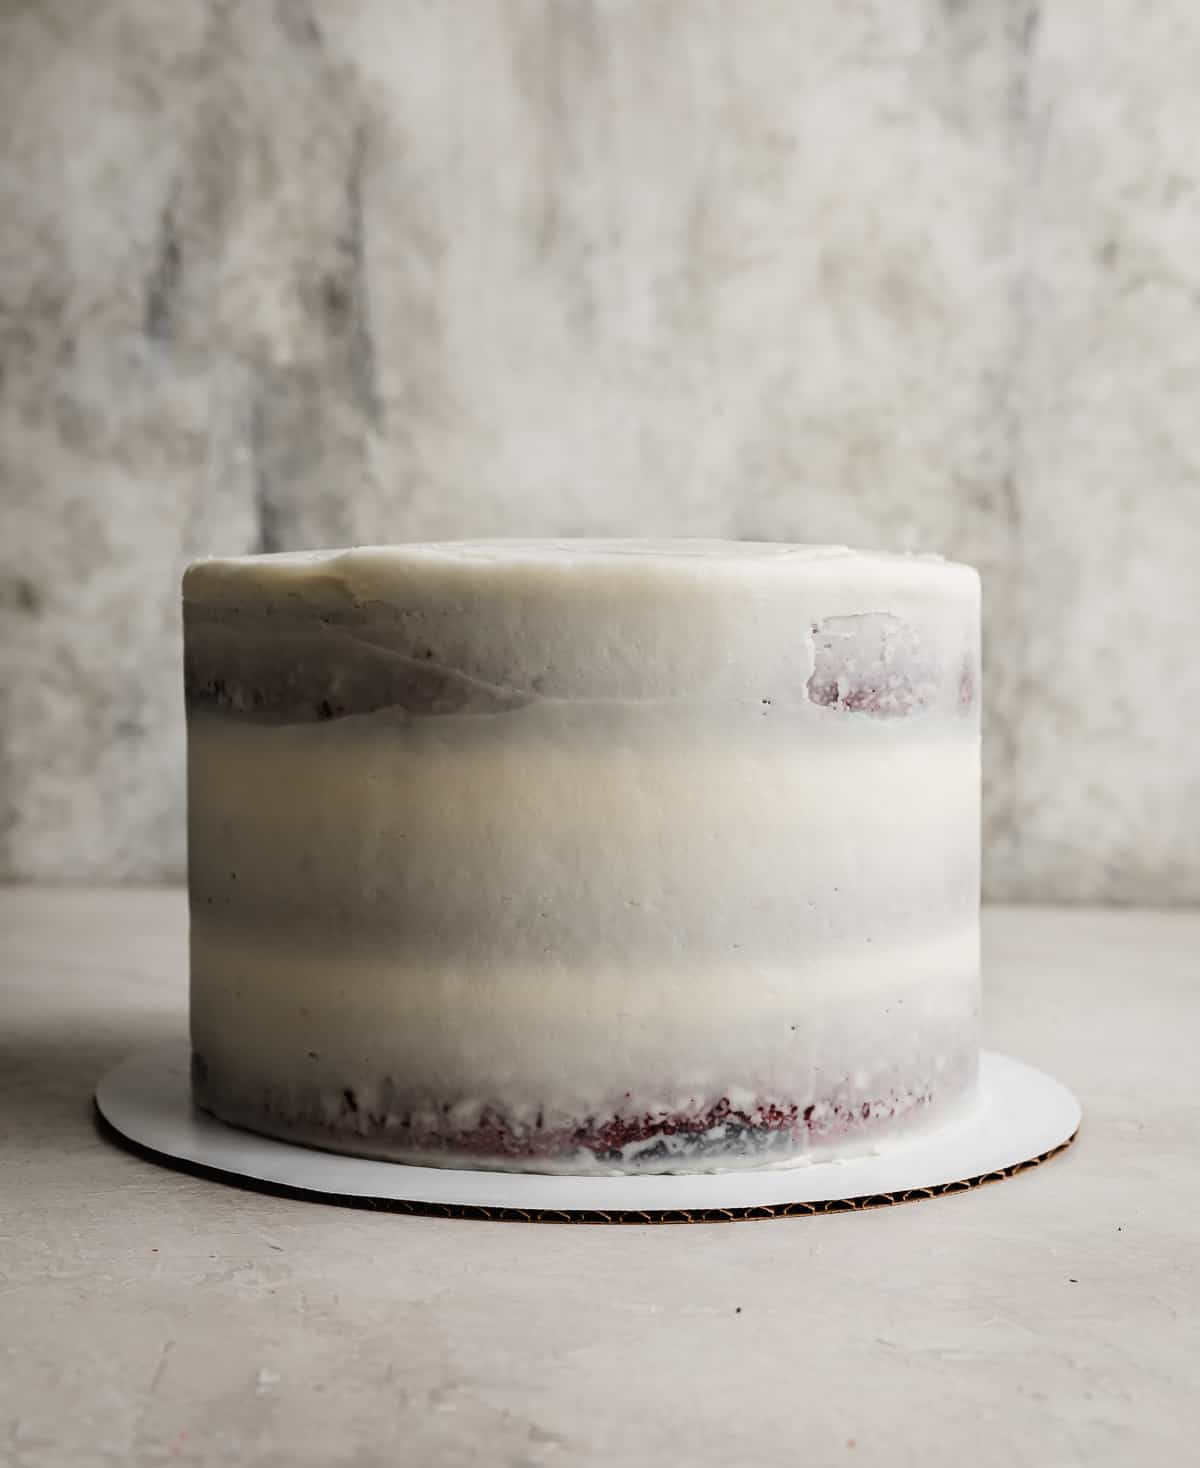
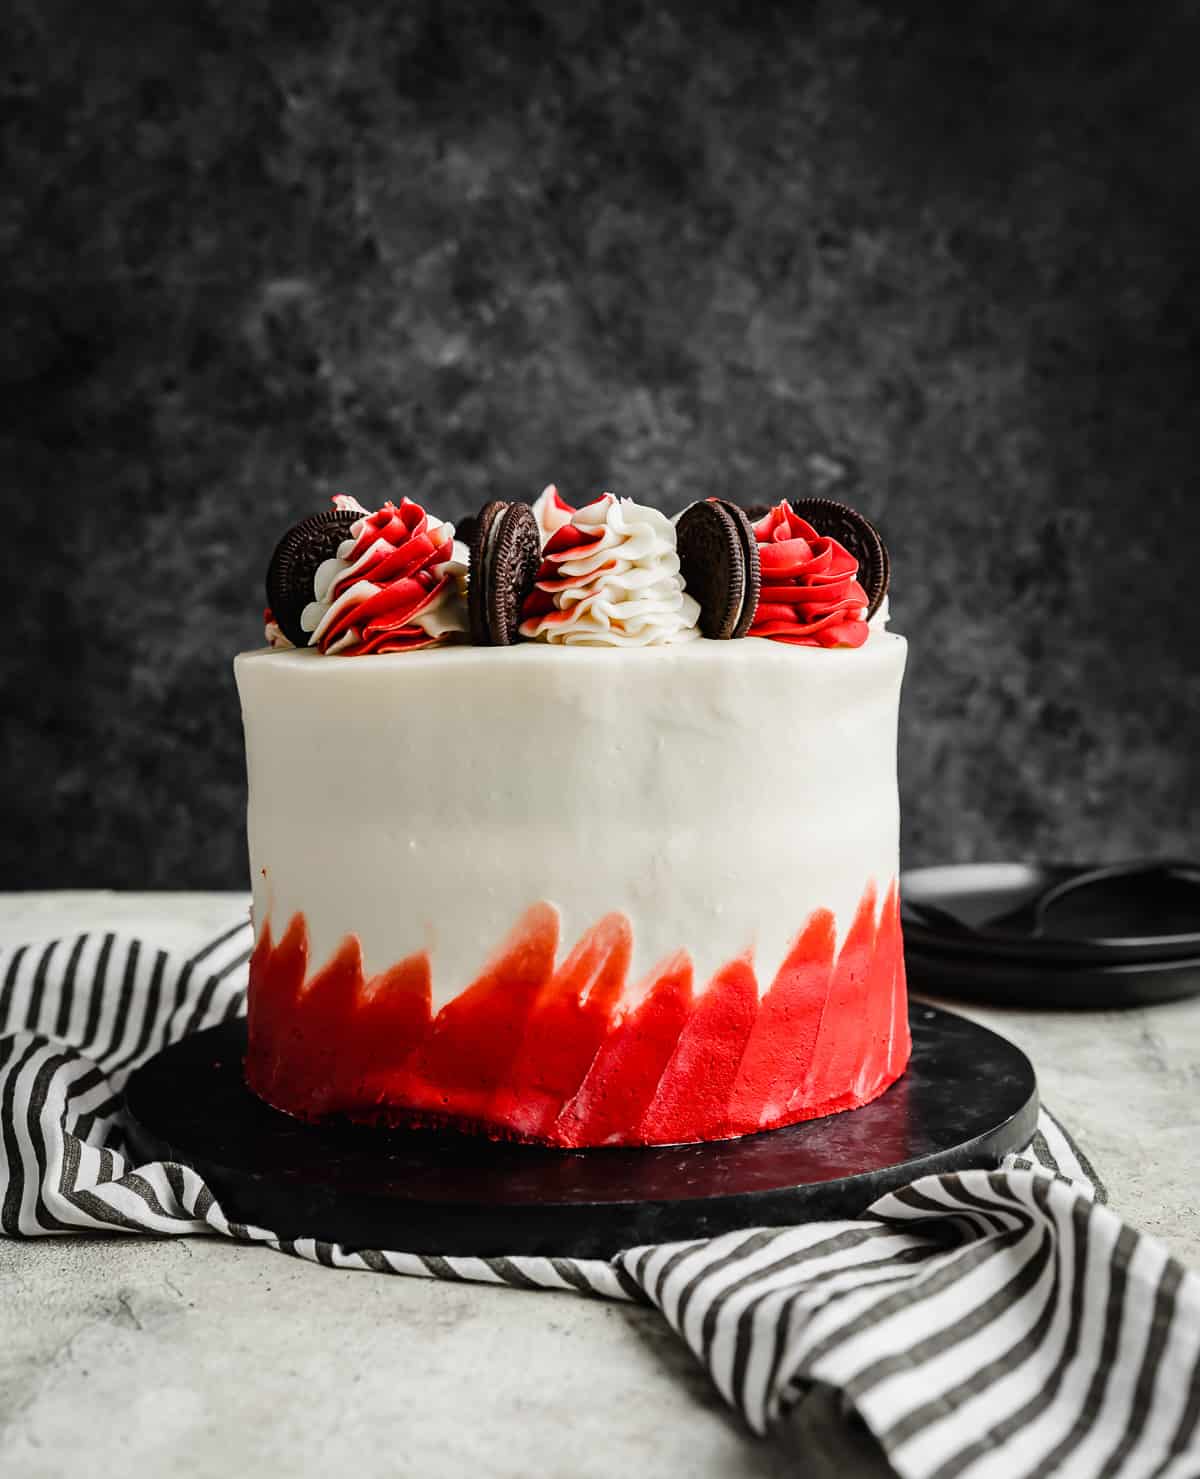
- Assemble the Oreo Red Velvet Cake. Place an Oreo red velvet cake layer, crust side down, on a cake board or stand. Spread a thin layer of the cream cheese buttercream evenly over the top of the cake. Repeat steps 1 and 2 with the second layer of cake. Place the third cake layer on top and crumb coat the Oreo velvet layer cake in a thin layer of buttercream. Freeze for a few minutes until the buttercream is cold and set. Add the final layer of frosting around the entire cake. Decorate as desired.
Recipe Tips
Cake Tips
A good way to tell when cakes are done is to tap on the oven door and watch the center of the cakes. If they move back and forth, they’re still liquid and are not baked through yet. Once they don’t move when you tap on the oven door, then open the oven and use a toothpick to ensure they’re fully baked. Don’t open oven too soon or cakes will sink in the middle!
Don’t over mix the cake batter when you combine the dry and wet ingredients. Over mixing at this stage can cause the cake batter to get tough, making it harder for your cake to get a nice rise. Also affecting your cake’s rise can be using expired baking powder or baking soda, so keep that in mind when baking cakes!
Gel food coloring gives you a richer, deeper color without having to use as much coloring as you would if using liquid food coloring.
Frosting Tips
If the frosting is too soft when it’s cold, add more powdered sugar in 1/2 cup increments to thicken it.
If desired for decoration, take about a cup of buttercream and color it red using red gel food coloring. We also added about a teaspoon of cocoa powder to the colored frosting to deepen the color. The color will also deepen for a few hours as the frosting sits.
Sifting your powdered sugar prior to adding it to the frosting can help get a smoother texture. Also, be sure to beat the butter and cream cheese until it is smooth and light in color!
Cake Assembly Tips
Keep in mind, this is a very soft frosting, so keeping it cooler than room temperature and keeping your cakes cold will help assembly go smoothly.
Having a small dollop of buttercream under the first cake layer and the stand or cake board will help keep the cake from sliding around as you assemble it.
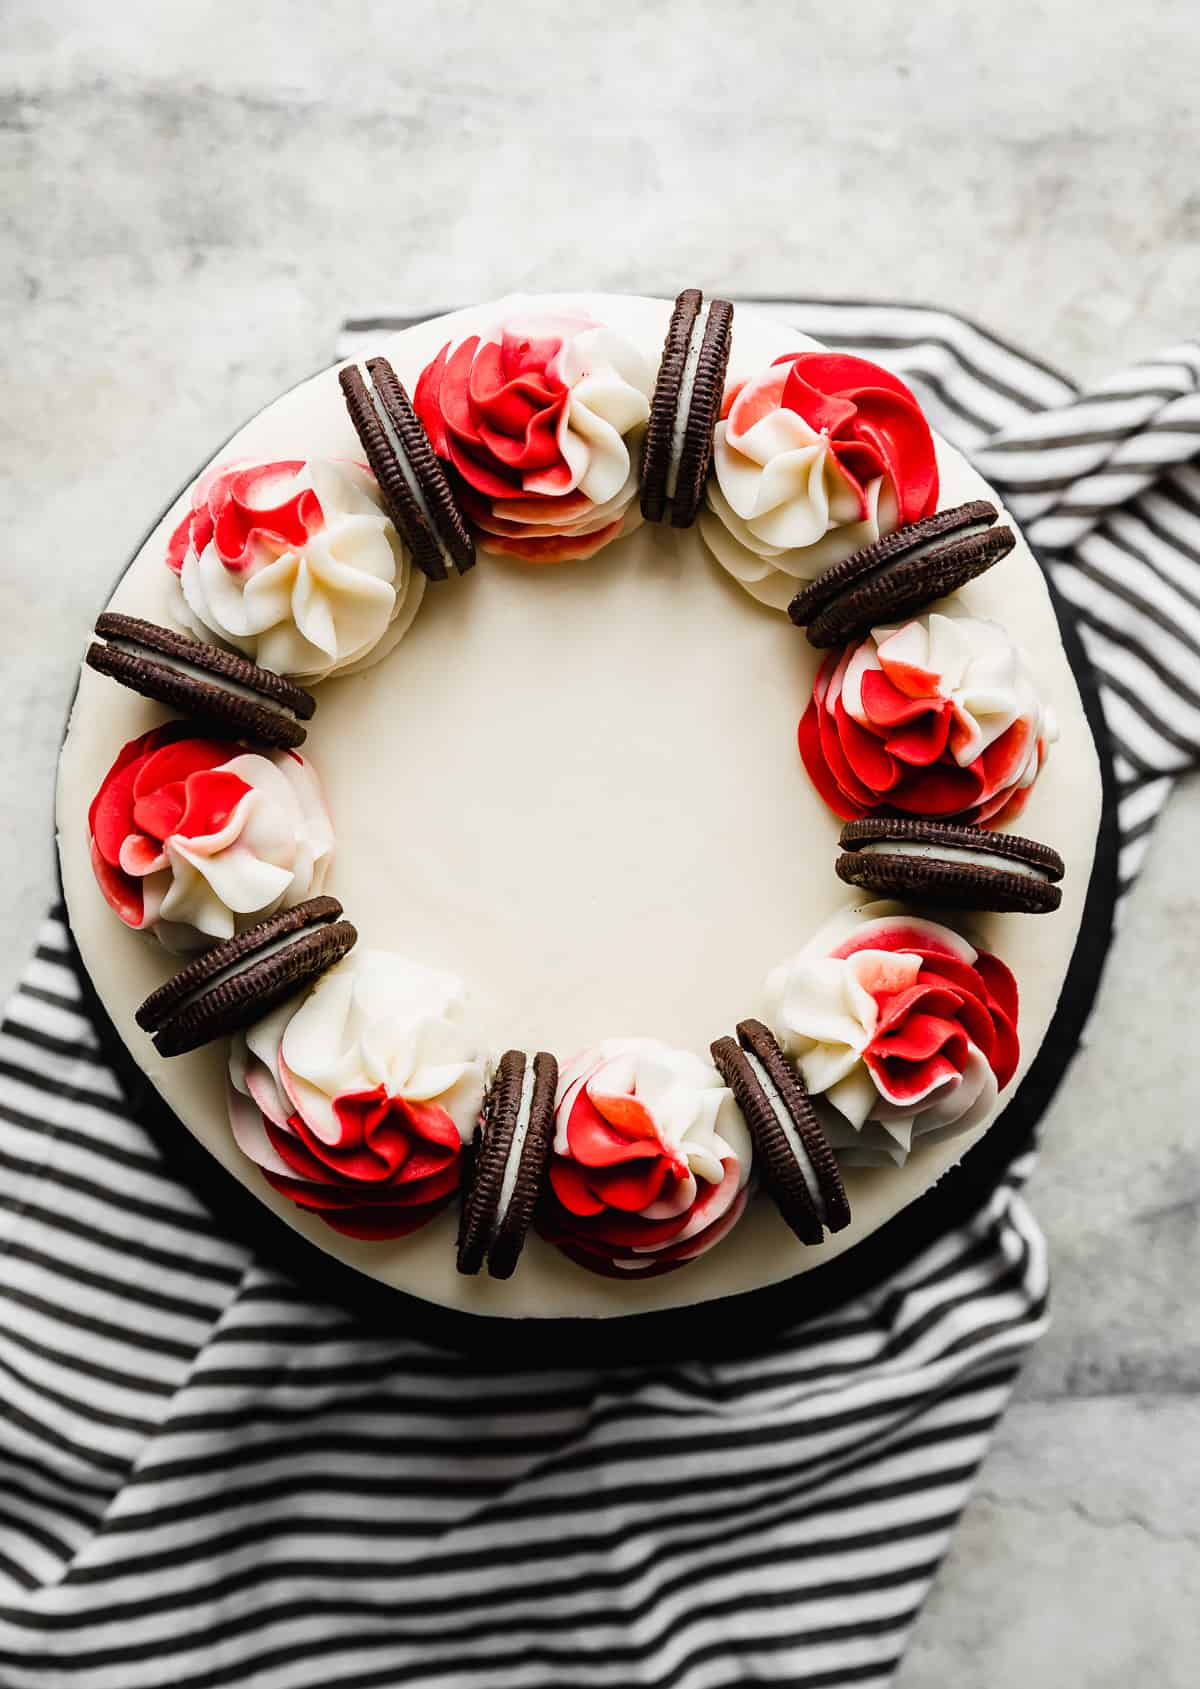
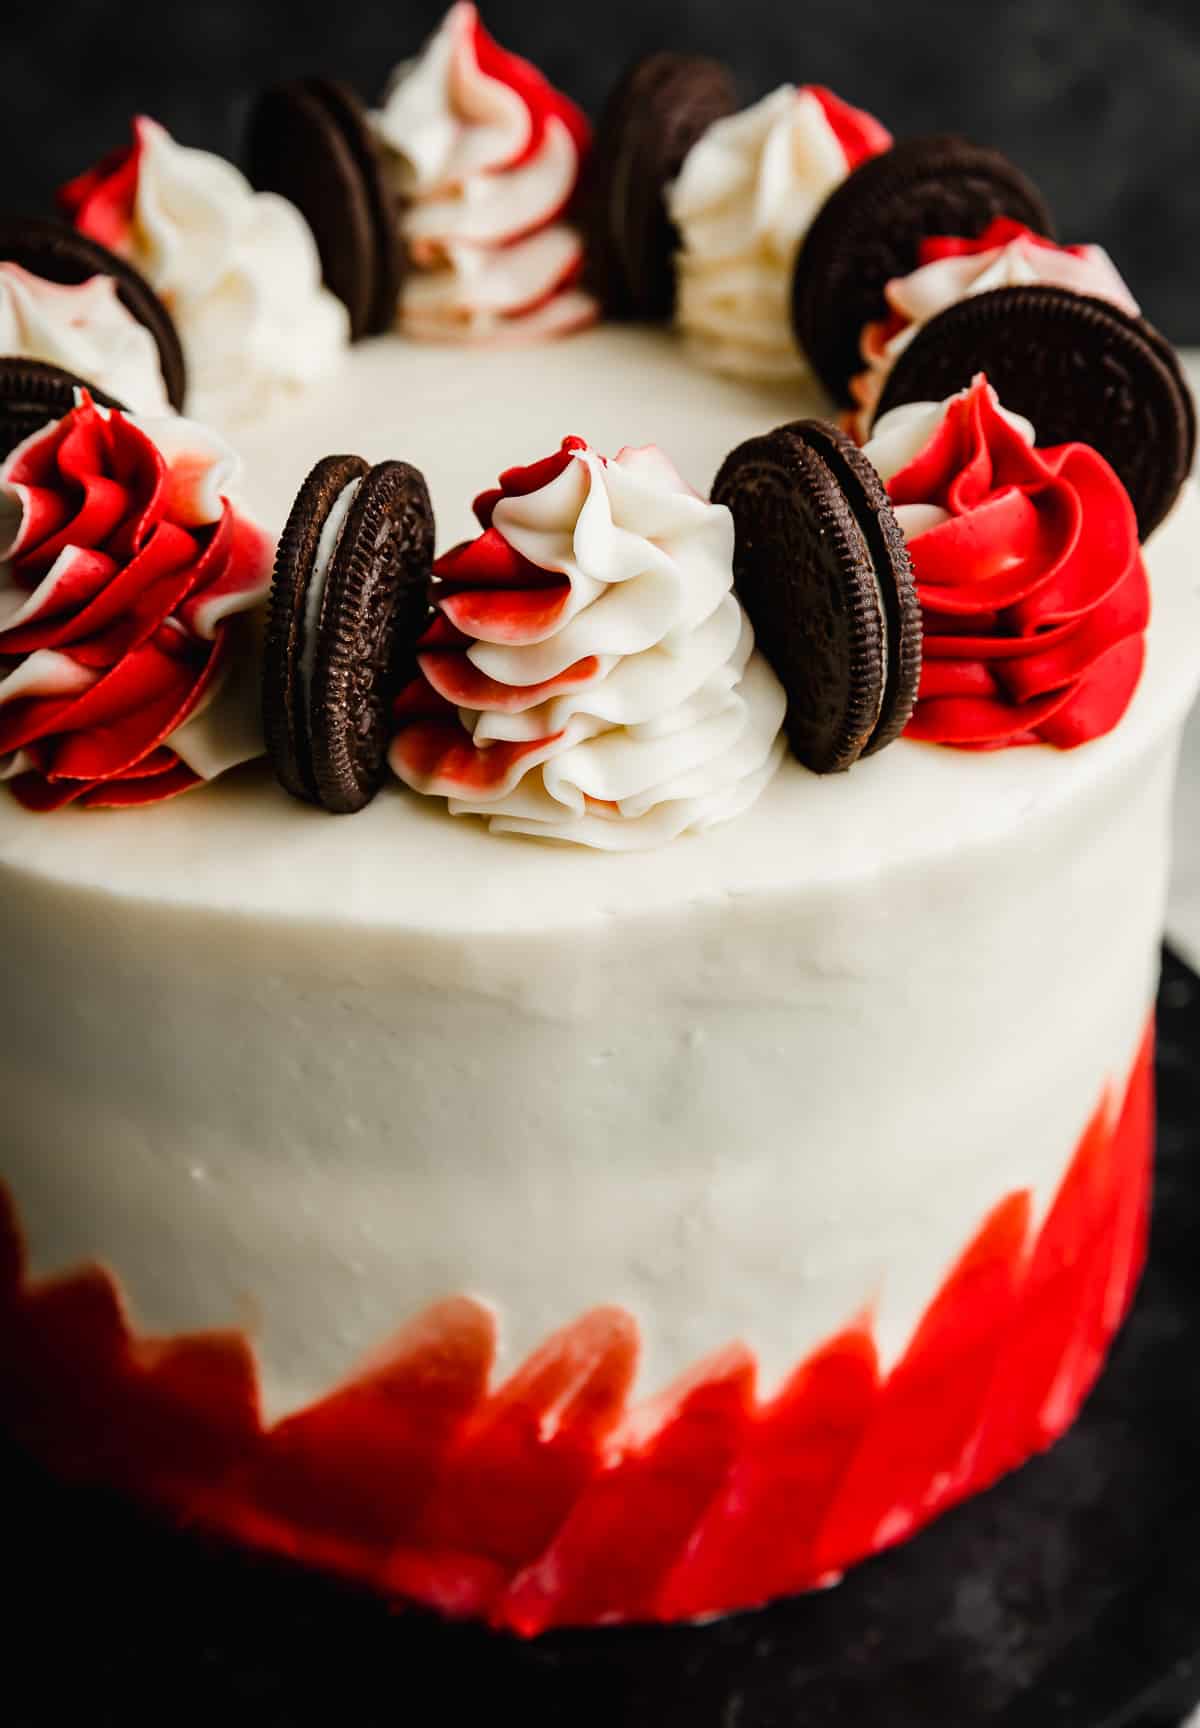
We piped a bead of red buttercream around the bottom of the cake and used an offset spatula to spread it diagonally upward. We also added the leftover red and white buttercream to a piping bag and used a Wilton 1M piping tip to pipe swirls around the top of the cake and then added Oreos between the swirls.
If you want smaller decorations on the red velvet cake with Oreo cookies, try using mini Oreos instead of regular Oreos!
Make Ahead, Storing, and Freezing
Store the cake covered in the fridge for 3-5 days (due to the cream cheese frosting).
If making the cake ahead of time, let the cake layers cool completely and then wrap in plastic wrap and store in the fridge for 1-2 days. You can also freeze the cake layers. Wrap in plastic wrap and store in the freezer for up to 1 week. If you need to store the cake for longer than 1 week in the freezer, then wrap the plastic-wrapped cake layers in a layer of aluminum foil and store in the freezer for 2-3 months. Remove from the freezer and let thaw overnight in the fridge. Next morning, remove from the fridge and remove the aluminum foil. Let sit at room temperature until thawed completely but still cool. Then assemble the cake.
To freeze a decorated cake, place the cake in the freezer until set (about 30 minutes). You want the frosting to be completely solid so it doesn’t get messed up when you wrap it. Wrap the entire cake in plastic wrap and store for up to 1 week. For longer than one week, store in the freezer with an additional layer of aluminum foil. Remove from the freezer and let thaw in the fridge overnight. Remove the cake the next morning and unwrap.
Store the buttercream in an airtight container in the freezer for 2-3 days. Scoop the frosting into a stand mixer and beat until fluffy again before frosting the cake.
For more information on storing and freezing cakes, check out my How to Store and Freeze Cakes guide!
FAQs
Yes they do! You will love this flavor combination! In fact, red velvet Oreos used to be an Oreo flavor you could buy once upon a time.
Red velvet flavor is a mild cocoa flavor with a slight tart/tangy flavor note. This is due to the buttermilk and white vinegar in the batter. You’ll see by looking at the ingredient list and proportions that it isn’t a fully chocolate cake, just enough to get a soft chocolate flavor.
Yes you can! Cake is really easy to make ahead of time. You can make the different elements of the cake and store them in the fridge or freezer and then assemble the cake at a later time (or day) or you can even freeze the cake! See my Make Ahead, Storing, and Freezing section above.
More Cake Recipes
- Moist Chocolate Cake Recipe
- Lemon Bar Cake
- Coconut Cookies and Cream Cake
- Biscoff Caramel Cake
- Carrot Cake with Pineapple and Pecans
Did you make this recipe? I’d love to hear about it! Click here to leave a rating and review, or scroll below the recipe card and do so there.
Stay up-to-date by following us on Instagram, Facebook, and Pinterest.
Oreo Red Velvet Cake
Ingredients
Oreo Crust
- 4 cups crushed Oreo crumbs - (about 40 Oreos)
- 1/2 cup unsalted butter - melted
- 2 tablespoons granulated sugar
Red Velvet Cake
- 3 3/4 cups all purpose flour
- 2 1/4 cups granulated sugar
- 1/4 cup unsweetened cocoa powder
- 1 1/2 teaspoon baking soda
- 1 1/2 teaspoon salt
- 1 1/2 cup buttermilk
- 1 1/2 cup vegetable oil - or canola oil
- 1 tablespoon vanilla extract
- 3 large eggs
- 1 1/2 tablespoons white vinegar
- 1 1/2 teaspoons red gel food coloring
Cream Cheese Buttercream
- 2 cups unsalted butter - set out at room temperature for about 15 minutes. The butter should be slightly soft but still cold
- 16 oz cream cheese
- 8+ cups powdered sugar
- 1 tablespoon vanilla extract
- pinch salt
- 2 tablespoons heavy cream
Instructions
Oreo Crust
- Preheat oven to 325º F. Prepare three 8-inch round cake pans by spraying with nonstick spray and lining the bottom with parchment paper.
- Place the Oreo cookies (do not remove the cream filling) in a food processor and pulverize until they’re fine crumbs. Transfer the crumbs to a medium sized bowl.
- Add the sugar and melted butter to the Oreo crumbs, stir to combine.
- Divide the mixture evenly between the prepared cake pans and press into the bottom of each pan. Bake for 3 minutes. Remove from the oven but leave the oven heated to 325º F to bake the cakes.
Red Velvet Cake
- While the oreo crusts are baking, whisk together the flour, sugar, cocoa powder, baking soda, and salt in a medium bowl.
- In the bowl of a stand mixer fitted with a whisk attachment add the buttermilk, oil, vanilla, eggs, white vinegar and red gel food coloring. Beat until the mixture is well-combined and uniform.
- Take off the whisk attachment and attach the paddle. With the mixer on low speed, carefully add the dry ingredients, a couple cups at a time until everything is combined and no dry streaks remain. Be careful not to over-mix!
- Divide the batter evenly between the three cake pans (adding it directly on top of the Oreo crust). Bake at 325°F for 35-45 minutes, until the centers of the cake are baked and a toothpick inserted into the center of the cake comes out with a few moist crumbs on it. (Don’t open oven too soon or cakes will sink in the middle.) Remove cakes from the oven and let cool in the pan for 10 minutes then turn out on a wire rack to cool completely.
Cream Cheese Buttercream
- In the bowl of a stand mixer fitted with a paddle attachment, beat the butter, cream cheese, and salt until it’s smooth and light in texture and color.
- Add the powdered sugar, a couple cups at a time, mixing well before adding more. Add a tablespoon of heavy cream as needed to keep the frosting smooth and not too stiff. Repeat until all powdered sugar and cream are added. If the frosting is too soft when it’s cold, add more powdered sugar in 1/2 cup increments to thicken it.
- If desired for decoration, take about a cup of buttercream and color it red using red gel food coloring. We also added about a teaspoon of cocoa powder to the colored frosting to deepen the color. The color will also deepen for a few hours as the frosting sits.
- KEEP IN MIND, this is a very soft frosting, so keeping it cooler than room temperature and keeping your cakes cold will help assembling the cake go smoothly.
Assembly
- Place a cake layer, crust side down, on a cake board or stand that has a small dollop of buttercream on it. This will help keep the cake from sliding around as you assemble it.
- Spread a thin layer of cream cheese buttercream evenly over the top of the cake.
- Repeat steps 1 and 2 with the second layer of cake, placing the second cake layer on top of the first layer.
- Place the third cake layer on top and crumb coat the entire cake in a thin layer of cream cheese buttercream. Refrigerate or freeze for a few minutes, until the buttercream is cold and no longer soft.
- Add the final layer of frosting around the entire cake. Decorate as desired. We piped a bead of red buttercream around the bottom of the cake and used an offset spatula to spread it diagonally upward. We also added the leftover red and white buttercream to a piping bag and used a Wilton 1M piping tip to pipe swirls around the top of the cake and then added Oreos between the swirls.
 Welcome to this delicious corner of the internet! Here I share the recipes my family loves.


22 Comments on “Oreo Red Velvet Cake”
I will be making this for my Mom’s birthday and I was wondering if you can use a 9″ cake pan? I do not have enough 8″ and am not wanting to buy new pans.
Cory, absolutely! I totally understand not wanting to buy a new pan. You will need to make some slight adjustments, however. First of all, you may need to add a few more Oreos to your crust so that it covers the whole bottom of your pan. Not too many, 5-10, and you may need to add another tbsp of butter. The texture of the mixture should be like wet sand. Then you can bake like normal. For the cake batter, since it will be slightly thinner, just be conscious of your time, as it may cook a little faster.
You are so sweet to make this for your mom’s birthday, happy birthday to her! Please let me know how it goes.
When I made the buttercream, it looked like the cream cheese and butter were starting to curdle so I started adding the powdered sugar but now the frosting is lumpy with butter. Any advice? Also, my frosting is still really yellow but yours looks so white and glossy! Do you know where I’ve got wrong? Thank you 😊
Georgy, sorry to hear about the problems with the frosting! It doesn’t sound like you did anything wrong. Sometimes things just happen – I’ve been there! To fix curdled frosting, a little heat can do the trick. Take a small amount of your mixture and microwave it for just a few seconds so it gets fairly warm. Add it back to your frosting and blend blend blend! You can repeat as necessary. Hopefully that helps it come together smoothly. As for the color, thoroughly beaten butter gets lighter in color as air is whipped into it, which is why my frosting is a light white color instead of buttery yellow. Next time, you might try bringing both the butter and cream cheese to room temperature so they blend more easily. Let me know how it goes!
Love this cake it’s a hit with my family. But I will say that it is not easy to cut. I even tried making the crust extra thin and it’s still quite difficult to slice. 10/10 for taste.
I’m sorry to hear about the difficulty of cutting through the crust, but I’m glad that taste-wise this was a hit for your family!
I’m planning to make a bigger size and I saw your reply about using 10-inch pan. Can I use a 10-in springform pan? Will the bumpy surface on the springform pan be a problem when I make the oreo crust? Will the crust crack?
I’m not sure! I haven’t made it in that pan before. But it SHOULD be OK. Give it a try and let us know how it turns out!
Family of 14 loveddddd it. Me too. Will make again.
So happy you love this recipe, Kelly! It’s a definite favorite. Thanks for leaving a star rating and comment!
Cake was a huge hit at my husband’s birthday. I want to make it again for my next event but cupcakes would be easier for this crowd. Any tips on converting from round cake too cupcakes?
Yes! I have a recipe just for you. This is the red velvet cake but in cupcake form. You can bake an Oreo on the bottom too if you’d like. https://saltandbaker.com/red-velvet-cupcakes/
I plan to make this for my daughter’s 13th birthday. She’ll be so excited. With the layers of Oreo crust, is there a better way to cut the cake so it stays together. I don’t want to butcher it 😬. Thanks!!
That looks so delicious! Do you remove the cream centers from the Oreo cookies before making the crust?
I always use the FULL Oreo when making a crust.
Do you have to do the red gel?
You can use red liquid food color. The color may not be as bright.
Hi am very much interested to try since my kids love oreo,
Is that by any chance 2 hv recipe for 2 layer 8 inc
No, just have it in this recipe. You could try the Red velvet cupcakes though! Just add an Oreo to the bottom of the cupcake liner. https://saltandbaker.com/red-velvet-cupcakes/
My son said this is the best cake he’s ever had. I would agree! Absolutely amazing. The oreo crust paired with the moist red velvet… wow! And the frosting is next-level. YUMMMMM!
Could I do two 9″ or 10″ cakes rather than three 8″? Or do you happen to have any conversions/suggestions for other sizes? I don’t think this will be enough servings for what I’d like, but my boyfriend’s birthday is in a week and I know he’d love this cake! Thank you!
I’d do 2 10-inch pans. If you want more servings you can 1.5x the recipe and do it in 3 10-inch pans.
Let me know if you have any more questions. Can’t wait to hear how he likes the cake!